3DPrinting
- Automatic Fire Extinguisher for 3D Printer Cabinet
Hey 3D printing fellas,
Are you worried about failures that can lead to disaster like printer catching on fire and burning down firniture and house? Do you use any kind of protection against fire?
I know metal enclosures are the best, but my printer is in the Ikea Lack enclosure. I checked connections and everything looks great, but I soldered cable on the heated bed anyway. Im not super worried tbh, but Im thinking about buying Stovetop Firestop and mounting it inside the enclosure just in case. This one is triggered with open flame only, so probably false activation is not possible. I would probably buy 2 more for kitchen.
There are also balls and other extinguisher shapes, but the one from the picture seems more recommended. Bad thing is I cant find that one availabls in europe. There are also smoke detectors, but they can only alarm you or cut the power.
What do you use? Can you recommend any good automatic extinguisher available in europe?
- Robotics/Kinematics - Rolling contact joints - YT upload today from Breaking Taps
This might be a useful reference to be aware of for projects, especially for very small designs.
https://www.youtube.com/watch?v=TQiLLcumqDw
- [Troubleshooting] Big stringing problem with flsun SR and Orcaslicer
Ok guys, I'm breaking down and posting here to see if anyone has any ideas. I'm greatful for any advice.
I have an upgraded flsun SR. I recently lost my computer (psu issue, waiting for replacement) and I took this opportunity to switch from Cura to Orcaslicer.
Over-all I'm very happy, and getting some good speeds, but I just cannot remove stringing no matter what I try:
- Retraction from 0-7mm. After about 3mm, no further effect
- Retraction speed from 30mm/s-50mm/s. No noticable effect
- Travel speed and acceleration both high (up to 350mm/s and 6000 accel. No effect
- Temp from 205-215 with no effect
- Dried filament and different colours, no effect
- Wipe on retract on and off, up to 2mm wipe distance and 100% retraction. No effect
- Messed with scarf seams on and off, no effect
- No effect from layer heights
My setup:
- Printer - FLSun SR running klipper with a speede pad
- Filament - Esun PLA+
- Upgrades - Deported fans, OMG v2 extruder, volcano hotend and high flow cht nozzle
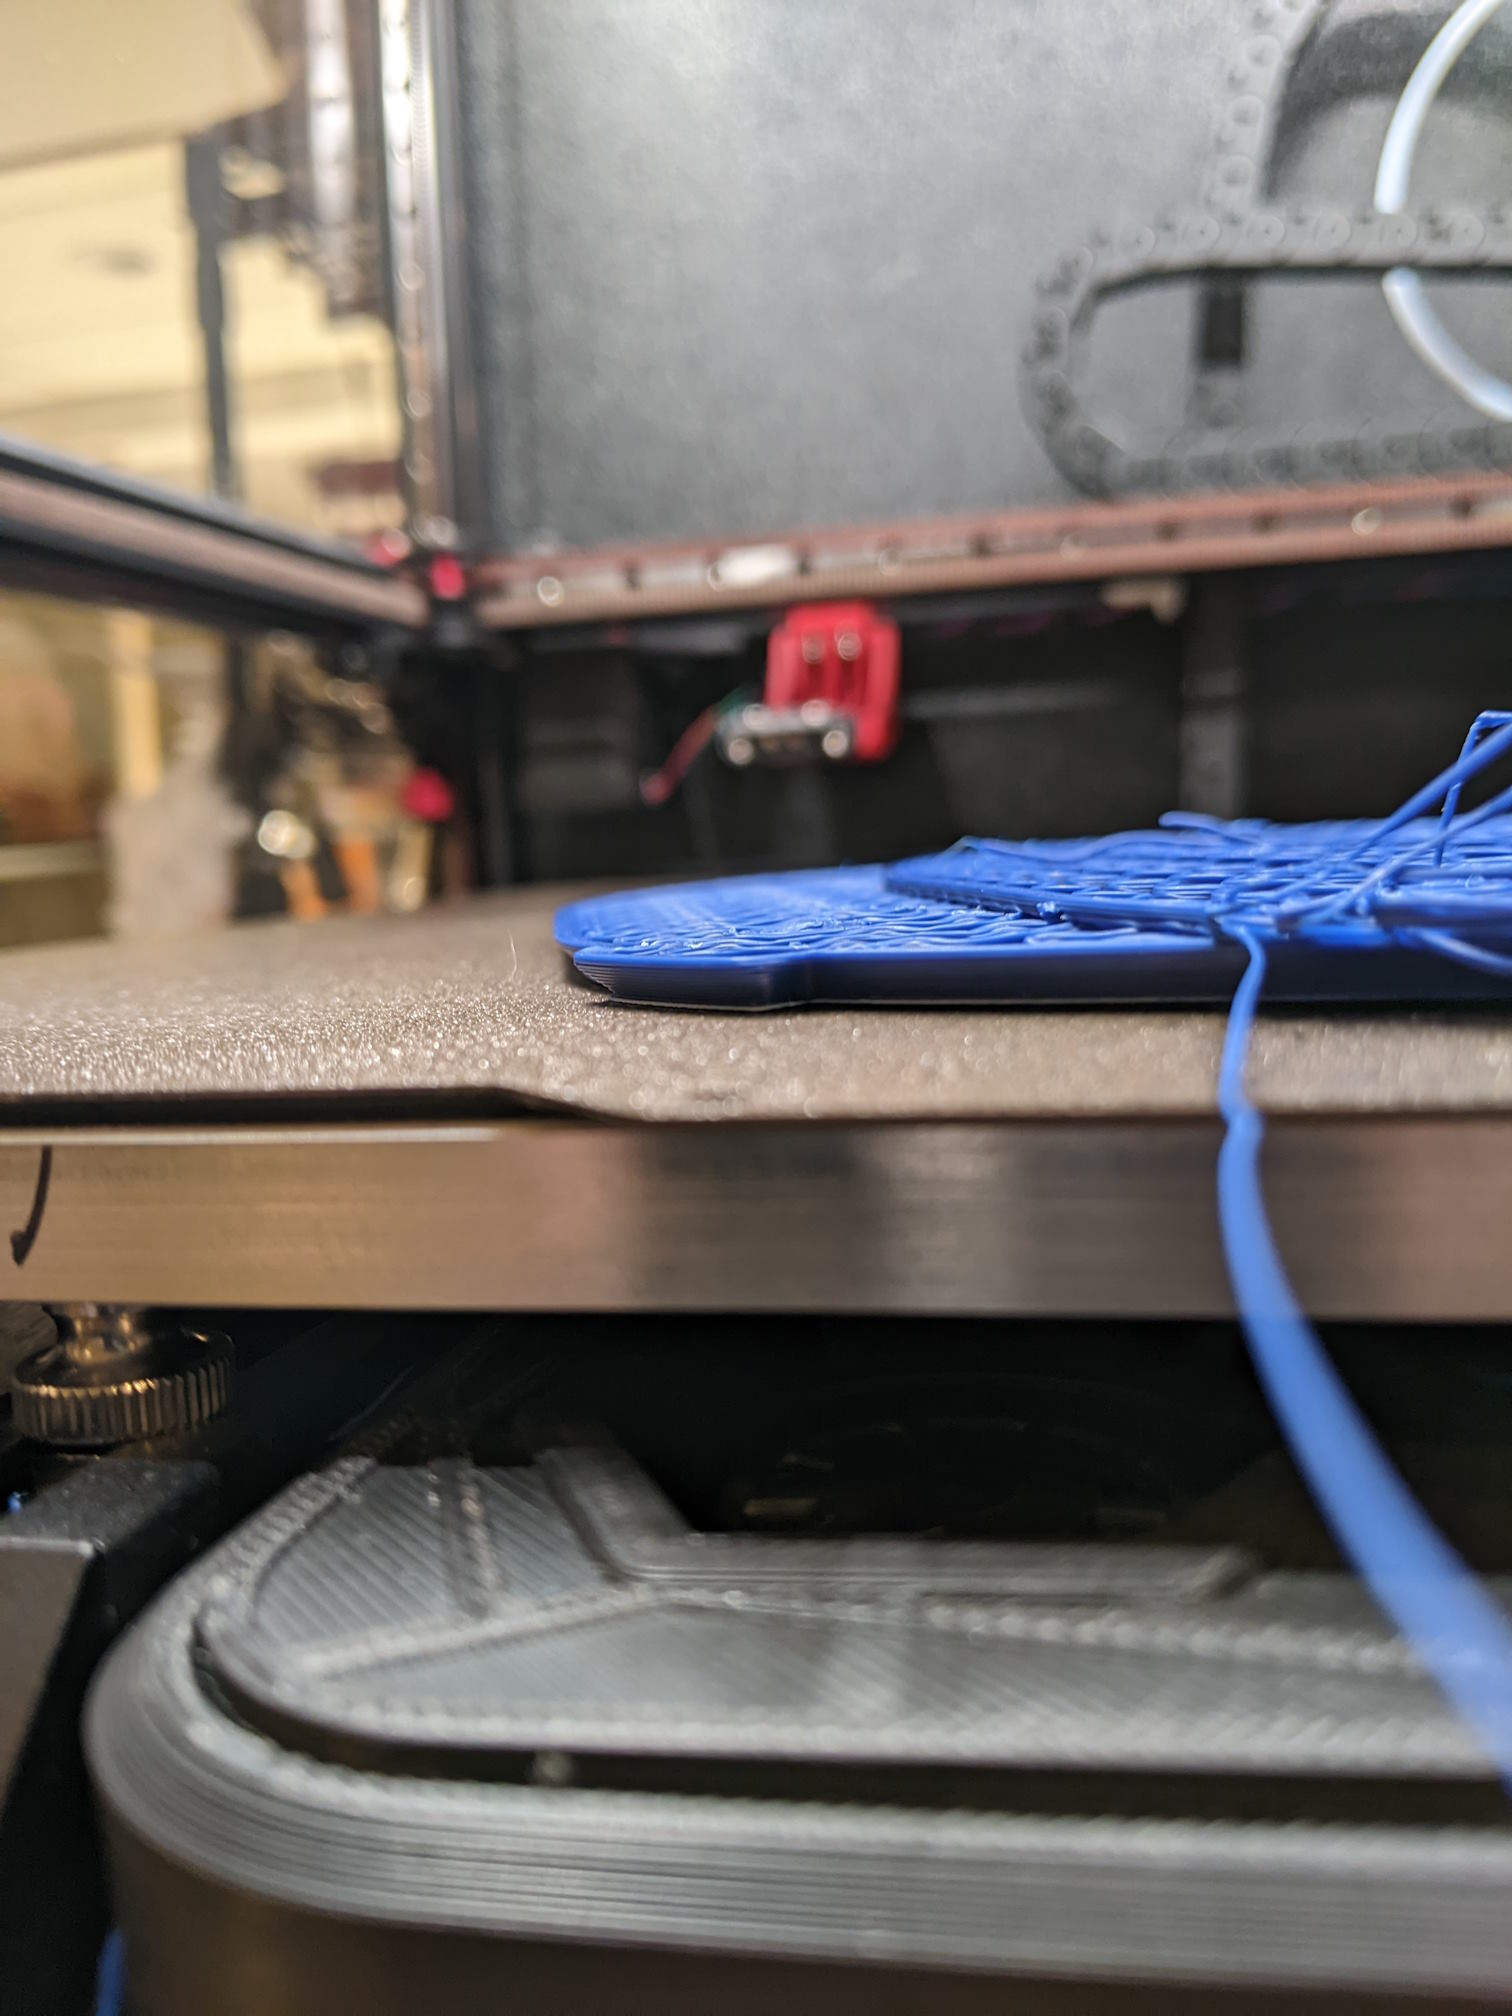
- My makeshift enclosure filament holder. Very happy with this set-up!
Hi guys, it's The Clog Guy, thought I'd try to share something other than problems...
Shortly before my printer went kaput again, I designed and printed a bracket to move my Bowden extruder to the hotend, making my printer a direct drive variant.
This posed an issue: I now needed to feed filament from the top of the printer rather than the side, where I previously mounted my filament holder.
I also have the issue many of you probably do where I am running out of room for my many filament spools.
Enter: The Rod. Two holes on either side of the enclosure, and I can hold probably 8 or so spools within the enclosure.
The Rod slides out on one end to allow for quick spool changes:
And I even had the foresight to put a clamp on one end to prevent it from getting yanked out all the way:
I canabalized the filament guide from the printer to the top of the enclosure with one screw so it would swivel, put those thumb tacks in to keep it from spinning all the way around, and the enclosure is ready to go!
Now if only my printer worked...
- [Troubleshooting] Clog Guy is back, and things have completely ceased making sense.
Hi guys. Please check my previous post for any background questions, I don't have it in me to go over everything again.
Long story short, I was having issues with clogging that were being caused by my hotend not reaching the reported temp. After a few days of troubleshooting and diagnosing the motherboard and Klipper settings, I gave up and decided the motherboard was faulty (even though I could not perform any tests to determine in) and bought an SKR mini. I got that all set up, and the printer has been working flawlessly since then.
Until now.
Same exact problem; one print goes perfectly fine, next print, failing to extrude by the 4th layer. I removed the clog, restarted the print, now can't even extrude the priming line. Fearing the worst, I disassemble the hotend, try hand feeding filament, and once again I am unable to push more than a few centimeters through before it gets clogged up. A probe thermometer reads ~160C while Klipper reports 200C.
What could possibly be happening here? The board is an aftermarket replacement from a completely different company, so I doubt it's a recurring manufacturer defect, but I have no idea what else can be causing this.
At this point I've spent so much time and money trying to fix this printer that I could almost buy a new one, but at this point I'm not convinced even that would solve the problem.
- What's your go-to "Bang for your Buck" filament brand?
As I'm graduating college in a few weeks, I'll be losing access to my university's free printers and filament. I'm going to build up a home lab with a couple printers where I can make goofy little mechanical projects as well as some components for my cars and stuff.
Who's your go-to for PLA and ABS/ASA filaments? Those will be my primary print jobs in any serious volume. I know our college's club has had hella problems with random chinese brand filaments not printing consistently but I also don't want to spend $30+ per kg for something like Prusament.
- First level printing too tall
Hi - Tenlog TLD3-Pro, printing with branx new Overture PLA+, printing an OpenSCAD exported STL sliced with Cura 5.7.1 (most recent as of yesterday).
I'm printing first level at 0.3mm thickness, but the print is irregularly too thick in height -- and not by a little bit, a lot. I've lowered the temperature to 190. I've physically lowered the bed to the point that the skirt didn't print, then raised it just barely back. I've reduced the flow rate to 85%, and I'm still getting the same results. I've lowered the build plate temperature, no change.
The skirt might be a tough high in spots, but I'm ending up with the first level of a prime tower that looks like this.
Any ideas? What else can I try?
- Heart Shaped Container FreeCAD Tutorial
Made a FreeCAD tutorial for making this container: https://makertube.net/w/mg7rdKStSUua7AhnAt1RoM I have to warn you that I made a bunch of mistakes and it may be really hard to follow.
- I've got a mix of good, bad, good, bad, and good again news/progress
This is a follow up from my spaghetti post a few days ago.
Good news: I caught the nozzle catching on the infill during travels. The infill must have been curling up ever so slightly. Turning z-hop on solved this. I also bumped my nozzle to 255 based on a temp tower, but I don't think my original issue was flow related.
Bad news: this brought me to the failure above - evidently my chamber temps are too low for this size of ASA part and it warped. Maybe the higher nozzle temp contributed. Maybe this size of ASA part is unrealistic despite not having sharp corners. Maybe it's the fact that it's continuous from side to side. I am still going to attempt to print a hollow cylinder to go between this piece and another similar piece in ASA, so I guess we'll find out!
Good news: the part did not let go of the build plate. I'm pretty happy about this. My first layer is not overly squished, I've never used any adhesion aids (glue stick, hair spray, ASA slurry, etc), etc. Tuning my print_start sequence is resulting in a very consistent first layer.
Bad news: the build plate came up with the print. Holding the build plate down with binder clips or the like would probably just make something else fail.
Good news: I had enough PETG in stock to use that instead. Zero warpage, so great success. I had to go a bit slower because a flow test showed that I'm limited to around 25 mm^3 for PETG before the extrude motor started misstepping, despite bumping temp to 255 °C. I limited flow to 20 mm^3 to be safe. The print's a success so meh.
- Gridfinity 2x2 organizer for my bathroom
Printed out this little bathroom or whatever organizer. Gridfinity is neat. Choose your bins, glue to the base and viola.
Stl https://thangs.com/category/Gridfinity
- I designed a 3D Printable e-reader case for Kobo's newest E-Readers
You can download the files on:
Thingiverse: https://www.thingiverse.com/thing:6615905
Printables: https://www.printables.com/model/874747
FreeCAD Design Files: https://github.com/the16bitgamer/16BitVirtualStudiosDesigns/tree/main/GLoA%20E-Reader%20Cases/6%20inch
The files are for all the 3D Printable components which makes up the e-reader case. What's not included in the files is the cutting profiles for the case that holds it. But you can just use duck tape or some flexible adhesive and it'll work. Along with the screws, nuts and magnets required.
- pooch/repkord made a printer lift itself
Source https://twitter.com/repkord/status/1788529858978717870
Video https://files.catbox.moe/ltbmfh.mp4
- Carboy dryer, stackable, for homebrewing. (OC)
STL https://www.printables.com/model/866603-carboy-dryer-stackable
Description I wanted a carboy drainer that was 3d printable (because why not?). They're stackable, too.
References:
- This model on Amazon was nice https://www.amazon.com/Blue-Carboy-Drainer-Pack-2/dp/B074KL8QD2
- I liked the handle cutout on this model https://www.printables.com/en/model/734966-carboy-drainer
- This model wasn't bulky enough and I didn't like the feet. https://www.printables.com/en/model/33122-carboy-drying-stand
- This seemed clever, but too fragile. https://www.printables.com/model/841046-carboy-dryer-for-plastic-23-litre-carboy
- This model was my main inspiration for size but wasn't bulky enough https://www.printables.com/model/305346-carboy-dryer
Licensing: Credit/attribution/link is my only requirement. Free to use, modify, or sell. Please share your work, I love to see it.
Shout out to !homebrewing@sopuli.xyz
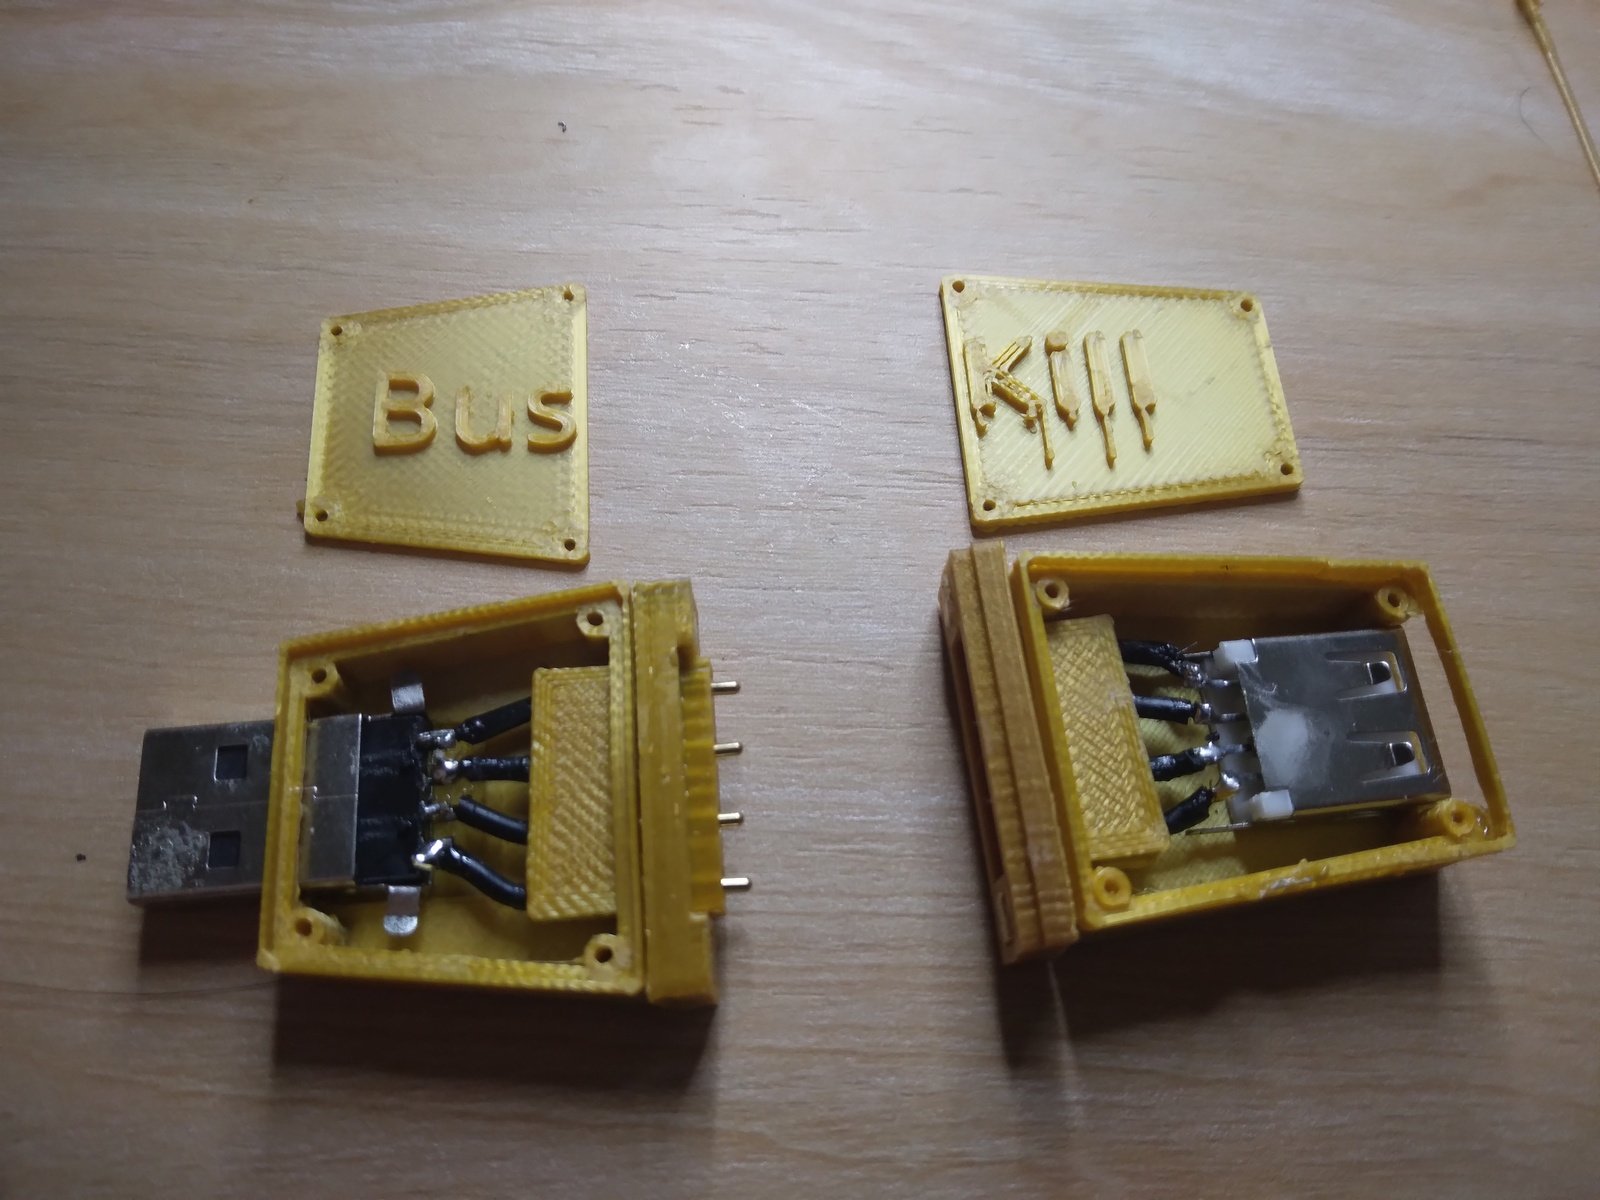
- 3D-Printed USB Dead Man Switch (Prototype Demo)www.buskill.in 3D-Printable BusKill Prototype Demo - BusKill
Demo of our DIY USB Dead Man Switch (prototype) with a 3D-Printable Case triggering a lockscreen when the kill-cord's connection is severed.

Today we're ecstatic to publish our first demo showing a homemade BusKill Cable (in the prototype 3D-printed case) triggering a lockscreen.
| [!3D-Printed USB Dead Man Switch (Prototype Demo)](https://www.buskill.in/3d-print-2024-05/) | |:--:| | Watch the 3D-Printed USB Dead Man Switch (Prototype Demo) for more info youtube.com/v/vFTQatw94VU |
In our last update, I showed a video demo where I successfully triggered a lockscreen using a BusKill prototype without the 3D-printed body for the case and N35 disc magnets. I realized that the N35 disc magnets were not strong enough. In this update, I show a demo with the prototype built inside a 3D-printed case and with (stronger) N42 and N52 cube magnets.
What is BusKill?
BusKill is a laptop kill-cord. It's a USB cable with a magnetic breakaway that you attach to your body and connect to your computer.
| [!What is BusKill? (Explainer Video)](https://www.buskill.in/#demo) | |:--:| | Watch the BusKill Explainer Video for more info youtube.com/v/qPwyoD_cQR4 |
If the connection between you to your computer is severed, then your device will lock, shutdown, or shred its encryption keys -- thus keeping your encrypted data safe from thieves that steal your device.
Why?
While we do what we can to allow at-risk folks to purchase BusKill cables anonymously, there is always the risk of interdiction.
We don't consider hologram stickers or tamper-evident tape/crisps/glitter to be sufficient solutions to supply-chain security. Rather, the solution to these attacks is to build open-source, easily inspectable hardware whose integrity can be validated without damaging the device and without sophisticated technology.
Actually, the best way to confirm the integrity of your hardware is to build it yourself. Fortunately, BusKill doesn't have any circuit boards, microcontrollers, or silicon; it's trivial to print your own BusKill cable -- which is essentially a USB extension cable with a magnetic breakaway in the middle
Mitigating interdiction via 3D printing is one of many reasons that Melanie Allen has been diligently working on prototyping a 3D-printable BusKill cable this year. In this article, we hope to showcase her progress and provide you with some OpenSCAD and
.stlfiles you can use to build your own version of the prototype, if you want to help us test and improve the design.Print BusKill
[!Photo of the 3D-Printed BusKill Prototype](https://www.buskill.in/3d-print-2024-05/)
If you'd like to reproduce our experiment and print your own BusKill cable prototype, you can download the stl files and read our instructions here:
Iterate with us!
If you have access to a 3D Printer, you have basic EE experience, or you'd like to help us test our 3D printable BusKill prototype, please let us know. The whole is greater than the sum of its parts, and we're eager to finish-off this 3D printable BusKill prototype to help make this security-critical tool accessible to more people world-wide!
- Resin Printing: Good for a Beginner with Limited Space?
I have recently obtained a friend's old Formlabs Form 2 SLA printer. I I am an absolute beginner to printing, but I am pretty excited to get into it.
However, the only place that I would realistically be able to put it is on my desk in my bedroom. From everything I've read, I need a better ventilated space with more tolerance for a mess than I could possibly provide.
I think that the right call is to just sell it and save up for some FDM printer, but at the end of the day, I have the SLA printer in hand.
I am asking whether these concerns about resin printers are really that bad and if I am actually fine to start learning printing with what I have in my bedroom.
- I designed a filament dryer mount for my tukkari mk4 enclosure
My SUNLU S1 Plus filament dryer was slipping around getting yanked forward on my TUKKARI TLX MK4 enclosure, so I designed this mount which fits into the existing slots on top of the enclosure. Prints in two pieces that screw together since otherwise the supports would be complicated. Had to print the larger piece on my big bed printer (artillery sw x2). I'm using up the last of my prusament galaxy black pla.
https://www.printables.com/model/871193-tukkari-tlx-prusa-mk3mk4-enclosure-sunlu-s1-plus-f
- Chonky nozzel + decent amount of material = opportunity for lots of spaghetti
Any suggestions before trying again after a reset? This is my first go round changing nozzle diameter. I went from a 0.4 mm nozzle to a 0.6 mm nozzle.
After the swap I checked my extrusion multiplier (no change needed) and tuned pressure advance (I had to decrease the value a bit, but it looks spot on now).
As part of the nozzle swap, I also bumped line width from 125% to 150% in Orca Slicer (should be around 0.9mm extrusion width) and increased layer height to 0.3mm. This should put me around 22 mm^3/s of material, which shouldn't be an issue for a Rapido 2 but this is the most flow I've pushed through it so far. Maybe I should bump temp a touch? I'm still at my fairly-low-for-ASA 230 that I was using with my 0.4mm nozzle.
The print didn't move on the bed and shows no signs of warpage. There also aren't any signs of curling on the areas that the nozzle must have hit to cause the layer shift.
The only thing that seems like a miss was having z lift turned off while troubleshooting a print quality issue. I had it set to only lift above 0.25mm (not on the first layer) and only lift below z 0mm (this probably disabled z-hop). Z hop when retracting is set to 0.2mm, which is less than my 0.4mm retraction length so it seems like changing the "only lift below below z" value would re-enable z-hop.
- Question about printing timeswww.thingiverse.com Strong Flying Propeller / Pull Copter for Kids :) (No supports!) by MeisterEdel
Update 10.02.2023: I remixed the rotor with the toroidal design :) Feel free to test ist out! https://www.thingiverse.com/thing:5846249 Update 23.02.2023: NEW PULLING RODS! Some had proplems with a breaking pulling Rod. So I beefed up the old one (Classic+) and also designed 2 totaly new ones (Ergon...

Hello all. I am very new to this but it is all very cool to me. I ran into a problem and I am not sure how to troubleshoot it. I downloaded a simple pull string helicopter off thingiverse. After running through the slicer software, the estimated build time is 131 hours. Relative to it’s size this seems insane. If I “run the simulated build”, there are long holds on one of the interior walls. I am hesitant to just “try it” and see if the pauses are a software thing that does not translate to the hardware. I am not sure how to break it down from here. Any advice?
Link to the plans included
- Giant 11x11 Ball [Matt Bahner]
cross-posted from: https://sh.itjust.works/post/18848847
> The puzzle itself is cool, but I actually found the explanations of the mechanism design and 3D printing techniques more interesting. > > He seems to have used a linear mechanism, similar to Oskar's floating anchors approach, but without the floating anchors. My guess is that the ball shape eliminated most of the twisting forces on the pieces which necessitated the floating anchors in Oskar's design. > > Flattening off small areas of the pieces to allow them to be printed in an orientation which doesn't require support bothered me a bit, but I can understand why he did it. Support material can be a pain in the ass.
- How do you build complex shapes?
I've made a large number of custom prints, and all of them were created using TinkerCad. It's an amazing toolkit, stupid easy to use but versatile. That is ... until something needs a tiny adjustment somewhere. That's when I feel it would've been neat to use parametric CAD instead.
I have spent many hours following Youtube tutorials for Onshape, Fusion, and FreeCAD. Tutorial shapes like a LEGO brick are fairly easy, although I admit that this kind of modeling is a sharp departure from the kid-friendly TinkerCad.
My problem is that I don't want to make simple coasters or keychains, but complex shapes like this one. It's a holder/mount for two different kinds of walkie-talkies that I use, and the blue part slides into a tray in my car's dash where it sits nice and snug.
Question: How the hell do I even get started modeling something like this?? There's not a single straight cuboid here. Everything is slightly wedge-shaped.
The way I do this in TinkerCad is that I build the hollow first: I made a 3d model of the walkie, a little oversized, set it be hollow, and drop it into the shape - that's the red or orange shells you see.
- 2mm thick layers on a trophy cupwww.youtube.com Always Printing Thick Layers 🏆
📂STL Link: https://www.printables.com/model/429173-minimalistic-trophy-vase-mode-and-base-with-hidden🔥Favorite Printer Currently on Sale: https://www.share...
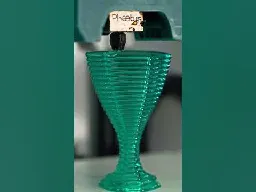
It's 1.75mm filament going into 2mm layers. lol, wtf. Still looks great, though.
- SBC Case Builder v3.0 can create thousands of cases for popular SBCs and standard motherboardswww.cnx-software.com SBC Case Builder v3.0 can create thousands of cases for popular SBCs and standard motherboards (mini-ITX, Pico-ITX, NUC...) - CNX Software
SBC Case Builder V3.0 case design utility has just been released with the ability to create over 1,000 standard cases - not including customization - for
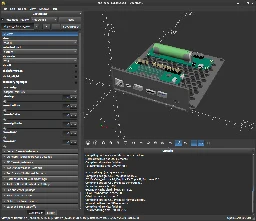
cross-posted from: https://lemmy.sdf.org/post/16042365
> SBC Case Builder v3.0 can create thousands of cases for popular SBCs and standard motherboards
- [Troubleshooting] It's the clog guy again - temp readings are bad!
OK guys, I finally found what the issue is, or at least kind of where it's coming from.
As some of you (and myself) suspected, my hot end is not reaching the reported temperature. I previously blamed the low readings on my IR thermometer on not being able to point the laser directly at the hotend, but it seems it was reporting accurate readings (around 95C when klipper reports 200C).
Now, here's where things get a little weird. At this point, I've used multiple thermistors, but swapped in a new one anyways. My board also has a pin for a second extruder thermistor, so I plugged it in to that one and changed the pin in my printer.cfg. No change.
I tried switching the bed and hot end thermistors on the board and in printer.cfg, no change.
I changed the thermistor "sensor type" from "EPCOS 100K B57560G104F" (same as the bed) to "Generic 3950", no change.
I found an article about tuning your pullup_resistance value. My cfg file did not have this value specified, so I added a line and started with the default of 4700, which made no difference (I'm assuming this value is loaded from the sensor type by default?). I toyed with the values until my thermometer read ~220C when setting the printer to that temp. However, to achieve this I had to adjust the pullup_resistance from 4700 to 13k+ (far beyond what should be needed) which makes klipper report 6C at room temp (print bed reports 27C). Unsurprisingly, I can hand-feed all the filament I want, but the temp reading is only now only accurate at 220C rather than only being accurate at room temp.
The thermistor, I feel, can be removed from the suspect list, as multiple thermistors exhibit identical properties.
I also feel the motherboard can be removed as well; there are three pins for thermistors, all three show accurate readings for the bed but identically inaccurate readings for the nozzle.
This only leaves software/ firmware, which I find incredibly odd for three reasons. For one, the printer was not even shut off in between "working" and "not working"; I successfully completed a print, and without shutting down, updating any configs, changing any settings etc., I swapped out the nozzle, and the printer hasn't worked since. Second, both the bed and nozzle thermistor are configured exactly the same, so if the nozzle is not set up properly the bed should be wrong too. Finally, Klipper is really straightforward and it's easy to configure things that commonly need configuring, it doesn't seem right that a configuration got changed and I'm completely incapable of finding what happened and fixing it.
As a Temporary FixTM, I'm inclined to get a nice reliable probe thermometer, calibrate a pullup resistance value for common print temps, then updating my cfg whenever I want to change temps more than ~5c. This is obviously not even close to an ideal solution, but I don't know what else to try. Everyone else I've seen with this issue has resolved it either through hardware replacement or fixing settings, and I've tried all I can with both.
- Very Specific Object: Redesigned brackets for SmartyKat brand Paw Perch Cat Shelf
In keeping with my usual tradition of harping on about the dumb shit I design and slap up on Printables:
https://www.printables.com/model/862518-cat-shelf-bracket-for-smartykat-paw-perch-or-build
These brackets solve a specific, but major, usability issue with the aforementioned brand and model of cat accessory widely sold at Walmart, Amazon, Chewy, Pet Smart, etc.
Conversely, there's nothing stopping you from screwing your own piece of wood to the top of a pair of these and arriving at roughly the same result without shelling out 30 of your hard earned Washingtons.
Cat tax paid:
- Are filament vacuum bags worthwhile?
I finally got a filament drying box and I'm using it prior to and during prints. It seems to be helping. I'm a bit of a color queen, so I keep a pretty big backlog of different filaments. I've been storing them in vacuum bags but the vacuum bags often seem to lose some of their vacuum after a few months; the whole process is a bit of a pain. Is this really worthwhile or as long as I'm using the drying box can I forgoe the vacuum storage? If vacuum storage is still a good idea, are there better bags I should be looking for that don't lose some of the vacuum after a few months or is that pretty standard?
- Stolen design being sold on etsy
I know it's not a new problem, but I don't know what I can or should do..
I'm made a design that I shared for free on thingiverse under a Creative commons, attributions, non-commercial license.
I've been made aware today that two etsy sellers are using my design, they didn't ask me and they don't attribute me. I don't particularly mind that people print and sell my design (I understand the added value of it already being printed for the user) , but I feel it is unfair to buyers to not be made aware that the design is free and they could easily get it printed cheaper elsewhere (design is small, it's like half a dollar worth of plastic).
It would also have been nice to send me a share of the profit made from my design..
What can I do or should I do ?
- (Troubleshooting) Filament runout detector not working.
Hey, my printer recently stopped working saying the filament ran out even though it was still in for use. I checked the sensor and sure enough it was worn down, so I replaced it. But now I'm getting the same message even though I just replaced the sensor and all the wires are connected back to the sensor and printer. If it helps any, I use a longer 5 pro.
- Anyone have any tips or tools to help with managing slicer profiles using inheritance?
Does anyone have any tips or tools to help with managing slicer profiles using inheritance? I primarily use SuperSlicer but have been dabbling with Orca Slicer recently.
I want to make a master printer profile, then have child profiles for specific purposes (production / draft, different layer heights, etc) that only override specific settings.
SuperSlicer has profile inheritance but if you make a change to the master profile, you have to manually propagate it into every child profile which is painful and error prone.
Orca Slicer also appears to have inheritance but you don't seem to be able to choose a user profile as the parent profile (only the immutable system profiles), which makes it useless.
I am thinking about creating a makefile driven system or python script to generate the child Super Slicer INI profiles... but it kind of pains me to have to use a separate system instead of managing it from the slicer UI.
- Best options for entry level 3D printing available these days?
I've had access to a roommate's 3D printer, but they'll be moving away soon :(
Wondering if people have takes on machines that are considered entry level today but may have evolved handy features since, well, when you were an entry level user.
If this isn't the right place for this please be nice I'm sorry
EDIT: okay I left out way too much detail for this to be answerable.
I've been printing for a year, so im not absolute beginner tier, and can benefit from some of the fancy gizmos like auto leveling, multi filament, etc. but i dont really venture beyond PETG and PLA. I mostly use 3D printing in other maker/diy projects; creating custom fixtures, quick tools and jigs, attachments for sewing machines, table saws, tool organization etc. You get the idea. Im not a mechanical engineer or prototyping medical equipment. I just really enjoy the power of being able to model something i need, print it, and immediate use it to complete a project. I dont do any figurines.
My budget is a maximum of 300 canadian dollars, including filaments, replacement parts, and add-ons. I am impartial to any brands or companies, i actually would perfer something that doesnt have proprietary bullshit, but the printers my roommate have are a (GEETECH) Ender 3 Clone and a TwoTree SP-5. The two tree is really awesome, but also over kill for what i need personally.
Other considerations are that It should be relatively compact, not mini/micro or anything, I would rather print twice or rearrange the models on the print bed some times and have more space than the other way around.
- Print in place ratchet design
After half a dozen iterations, this was the first reasonably working, acceptable feeling, and good-sounding ratchet mechanism.
allows clockwise rotation blocks counterclockwise rotation
design features:
- allows for a large inner bore (e.g. rotary encoder shaft or 5.2mm screwdriver bit)
- printable with 0.4mm nozzle
- 2cm diameter
- no assembly required. Print in place.
To get a full ratchet: mirror the assembly and add a mechanism/part that pushes one of the springs out. In neutral both leavers are engaged and the ratchet is completely locked.
Btw. Good luck copying it without going through half a dozen of iterations. Going from it barely works to this isn't easy. For my part: Version 5 was working and close to the final design. It took another 10 rounds to get it usable and from there some more to fine-tune it.
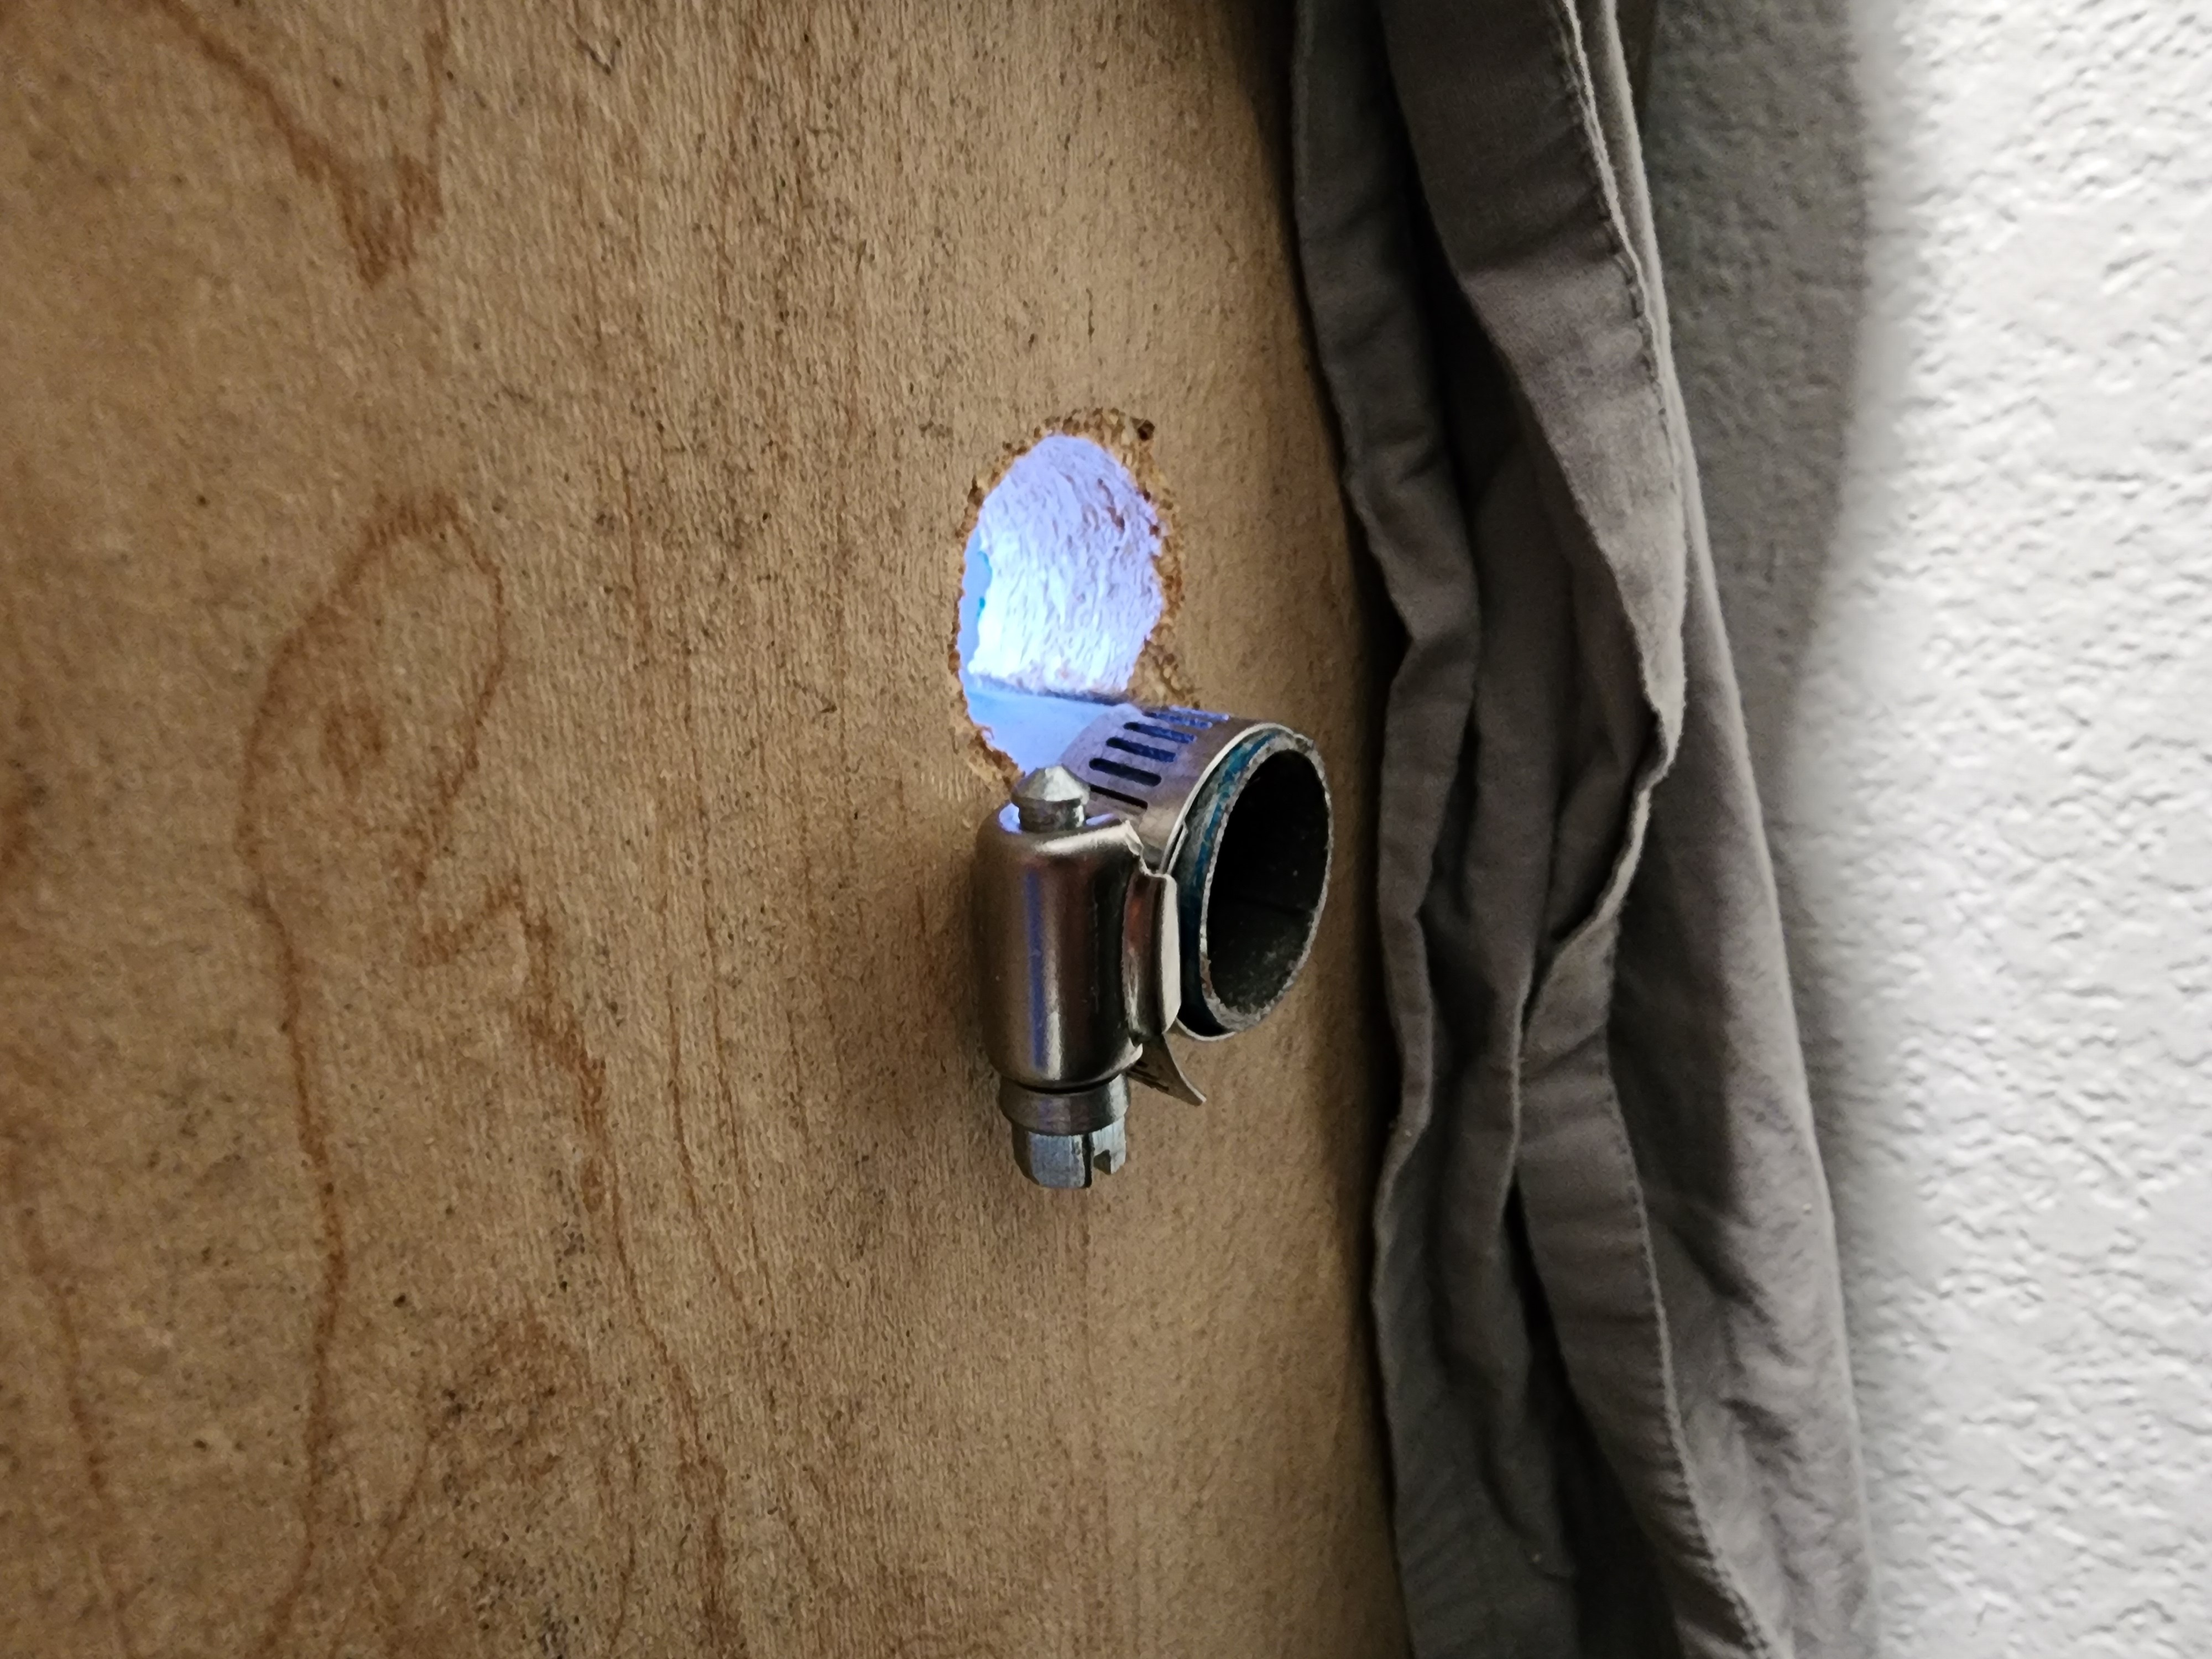
- [Troubleshooting] [LONG] Clog test write up - this time with pictures!
First I'd like to say thanks to everyone for looking at these posts and trying to help, and sorry to anyone who may be annoyed. Trust me, I'm not happy either.
I'm jumping back and forth between making this write up and recreating the clog by hand feeding filament into the hotend. This test was already performed earlier today and I got the same clog as I have been, so the extruder can be removed from the list of possible culprits. Anyways, here's the steps I'm following:
1. Verify temperatures are within acceptable range
This is my temp chart upon starting the printer. I used a thermal laser to test both nozzle and bed and they were within the range of accuracy of the laser. The laser is not accurate enough to get a good reading on the heat block; however, a few drops of water on the heat block boils within seconds when the temp is set to 100C, whereas at 90C it does nothing, so the nozzle is accurate at least to this temp.
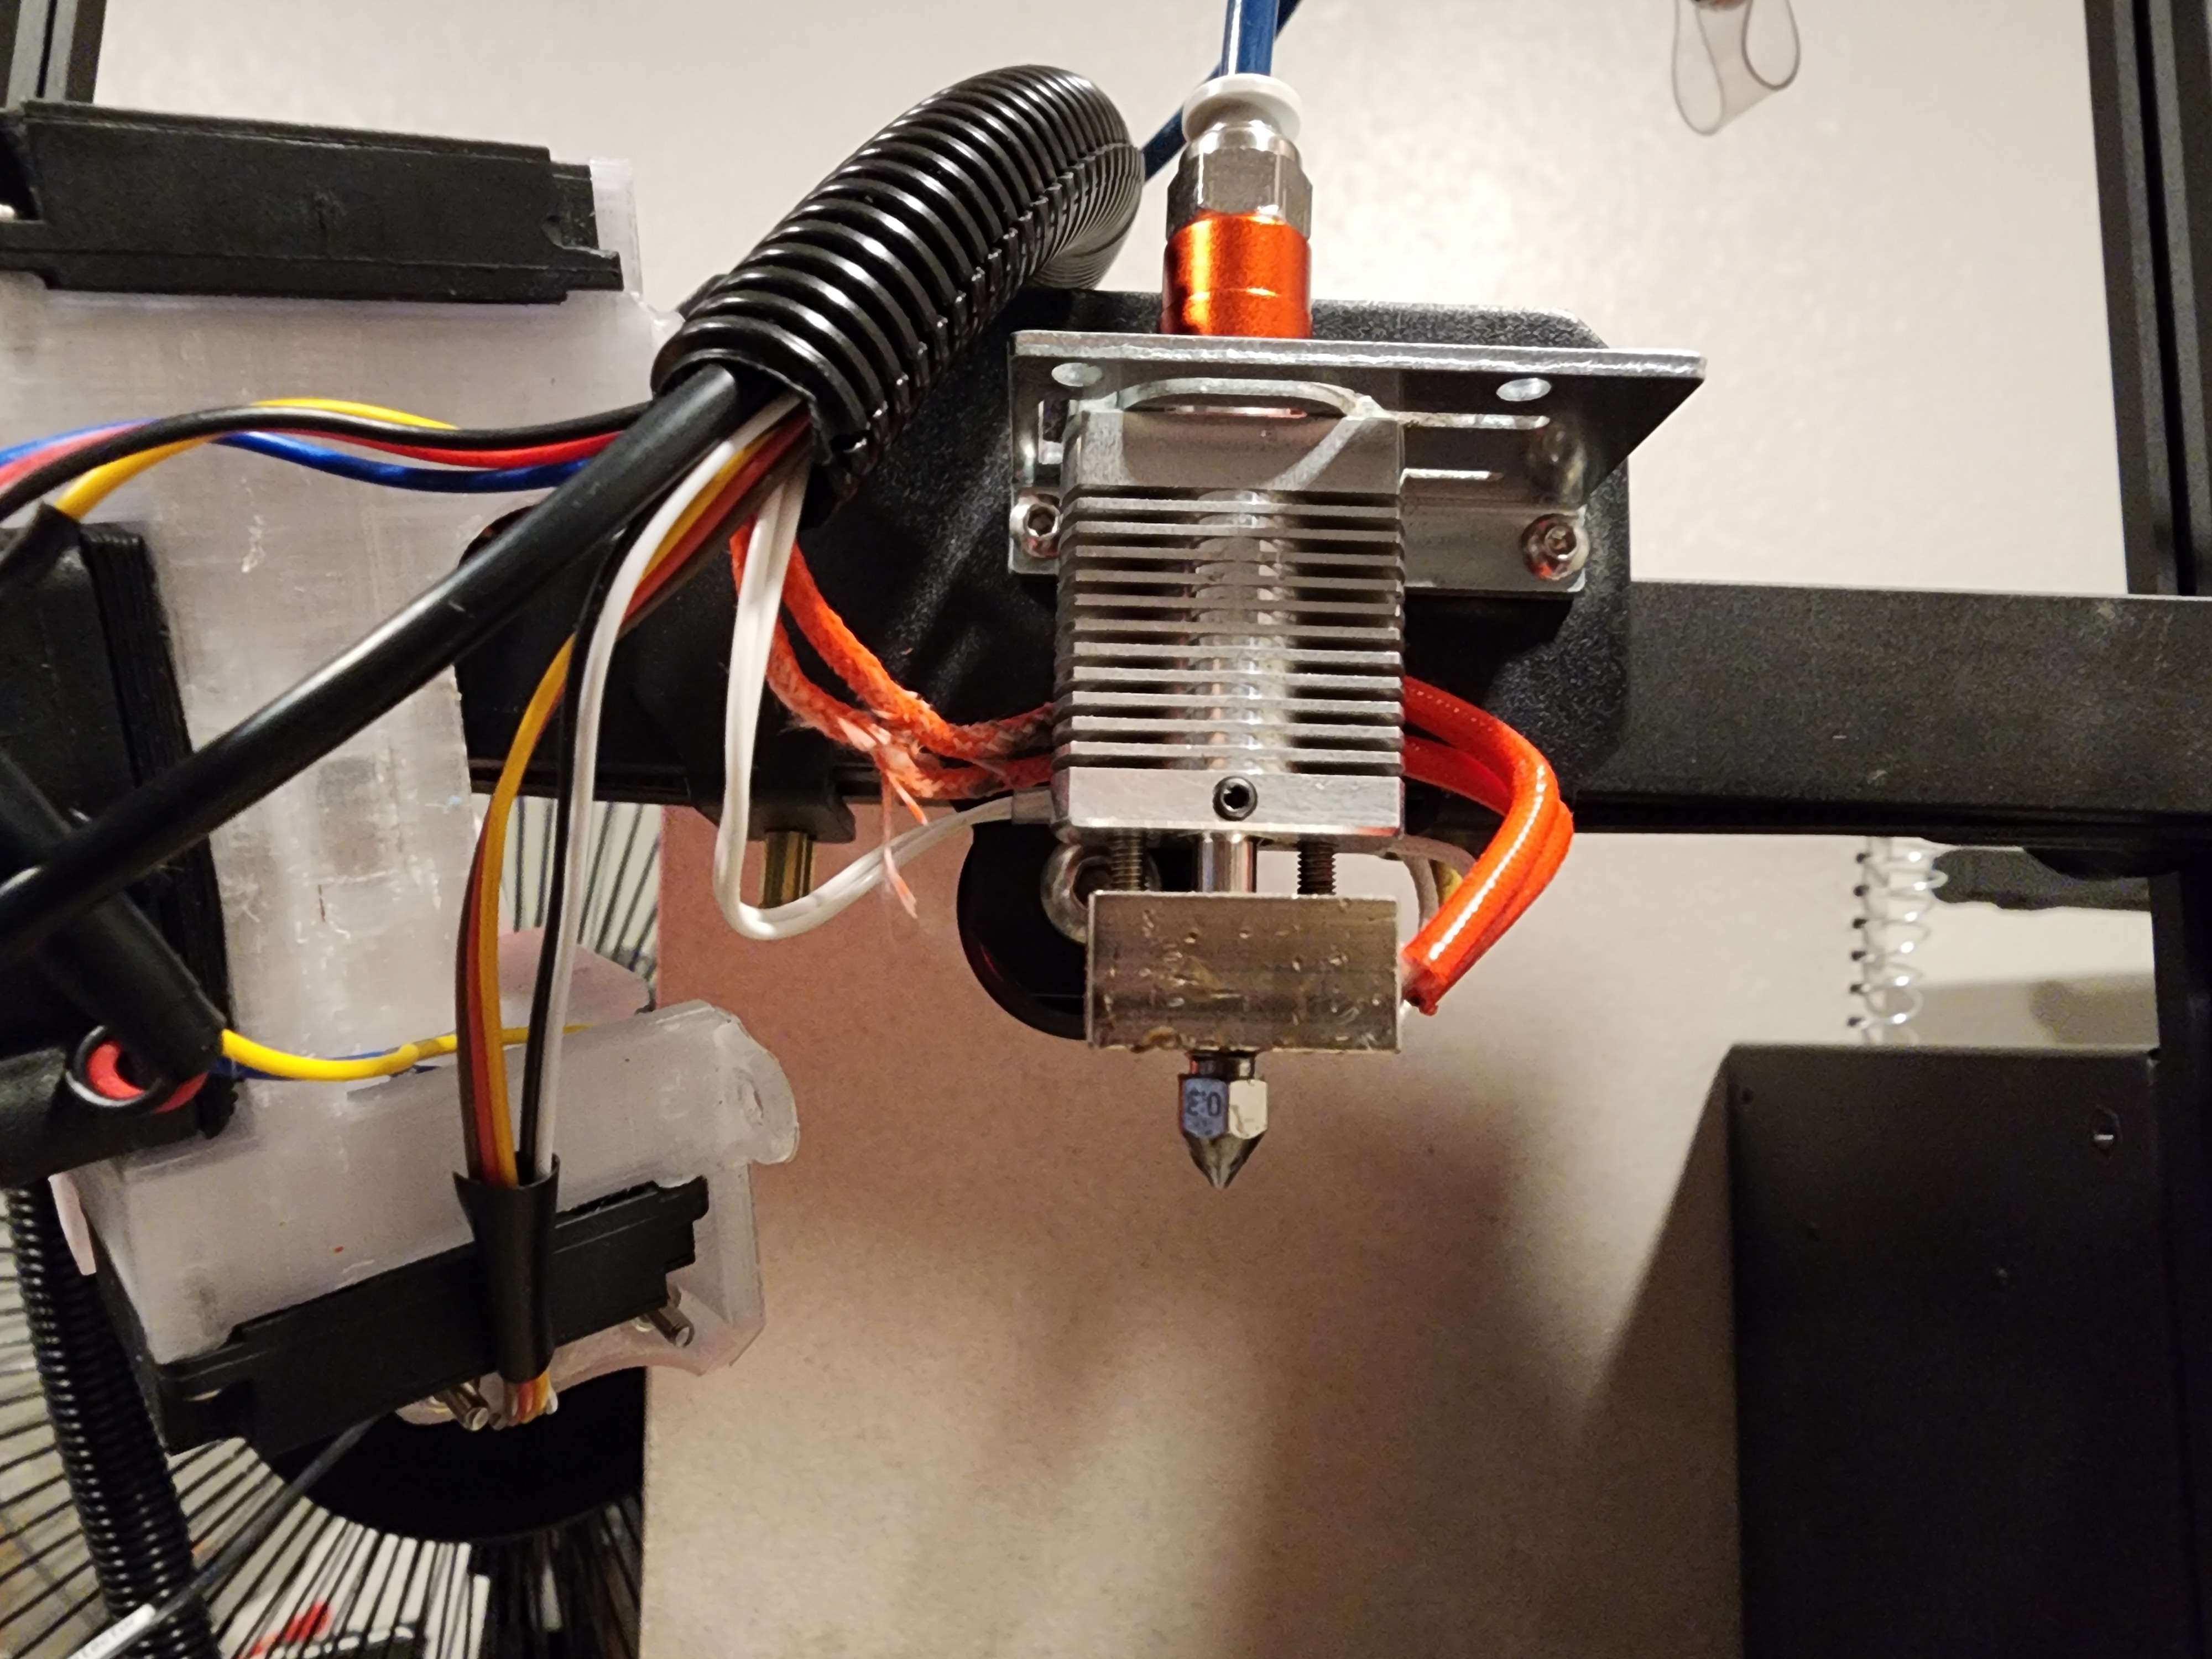
2. Assemble hot end
This is what my hotend assembly looks like without the nozzle or bowden tube. It should be noted that my printer has been modified such that the bowden tube going from the extruder is fed all the way through the heat sink to the nozzle, rather than having a fixed tube inside the heat break. I understand that this modification itself could introduce the issue I'm facing, but the issue started before the mod was done, so I don't think it is the cause.
Nozzle cleaned with blow torch and wire brush.
Underside of the heat block. The picture makes the threads look a lot worse than they actually are, in the photo it looks like some sort of gunk or shavings are at the end but after inspecting the block and scrubbing it with a wire brush there isn't anything there. The nozzle also threads in without any issue.
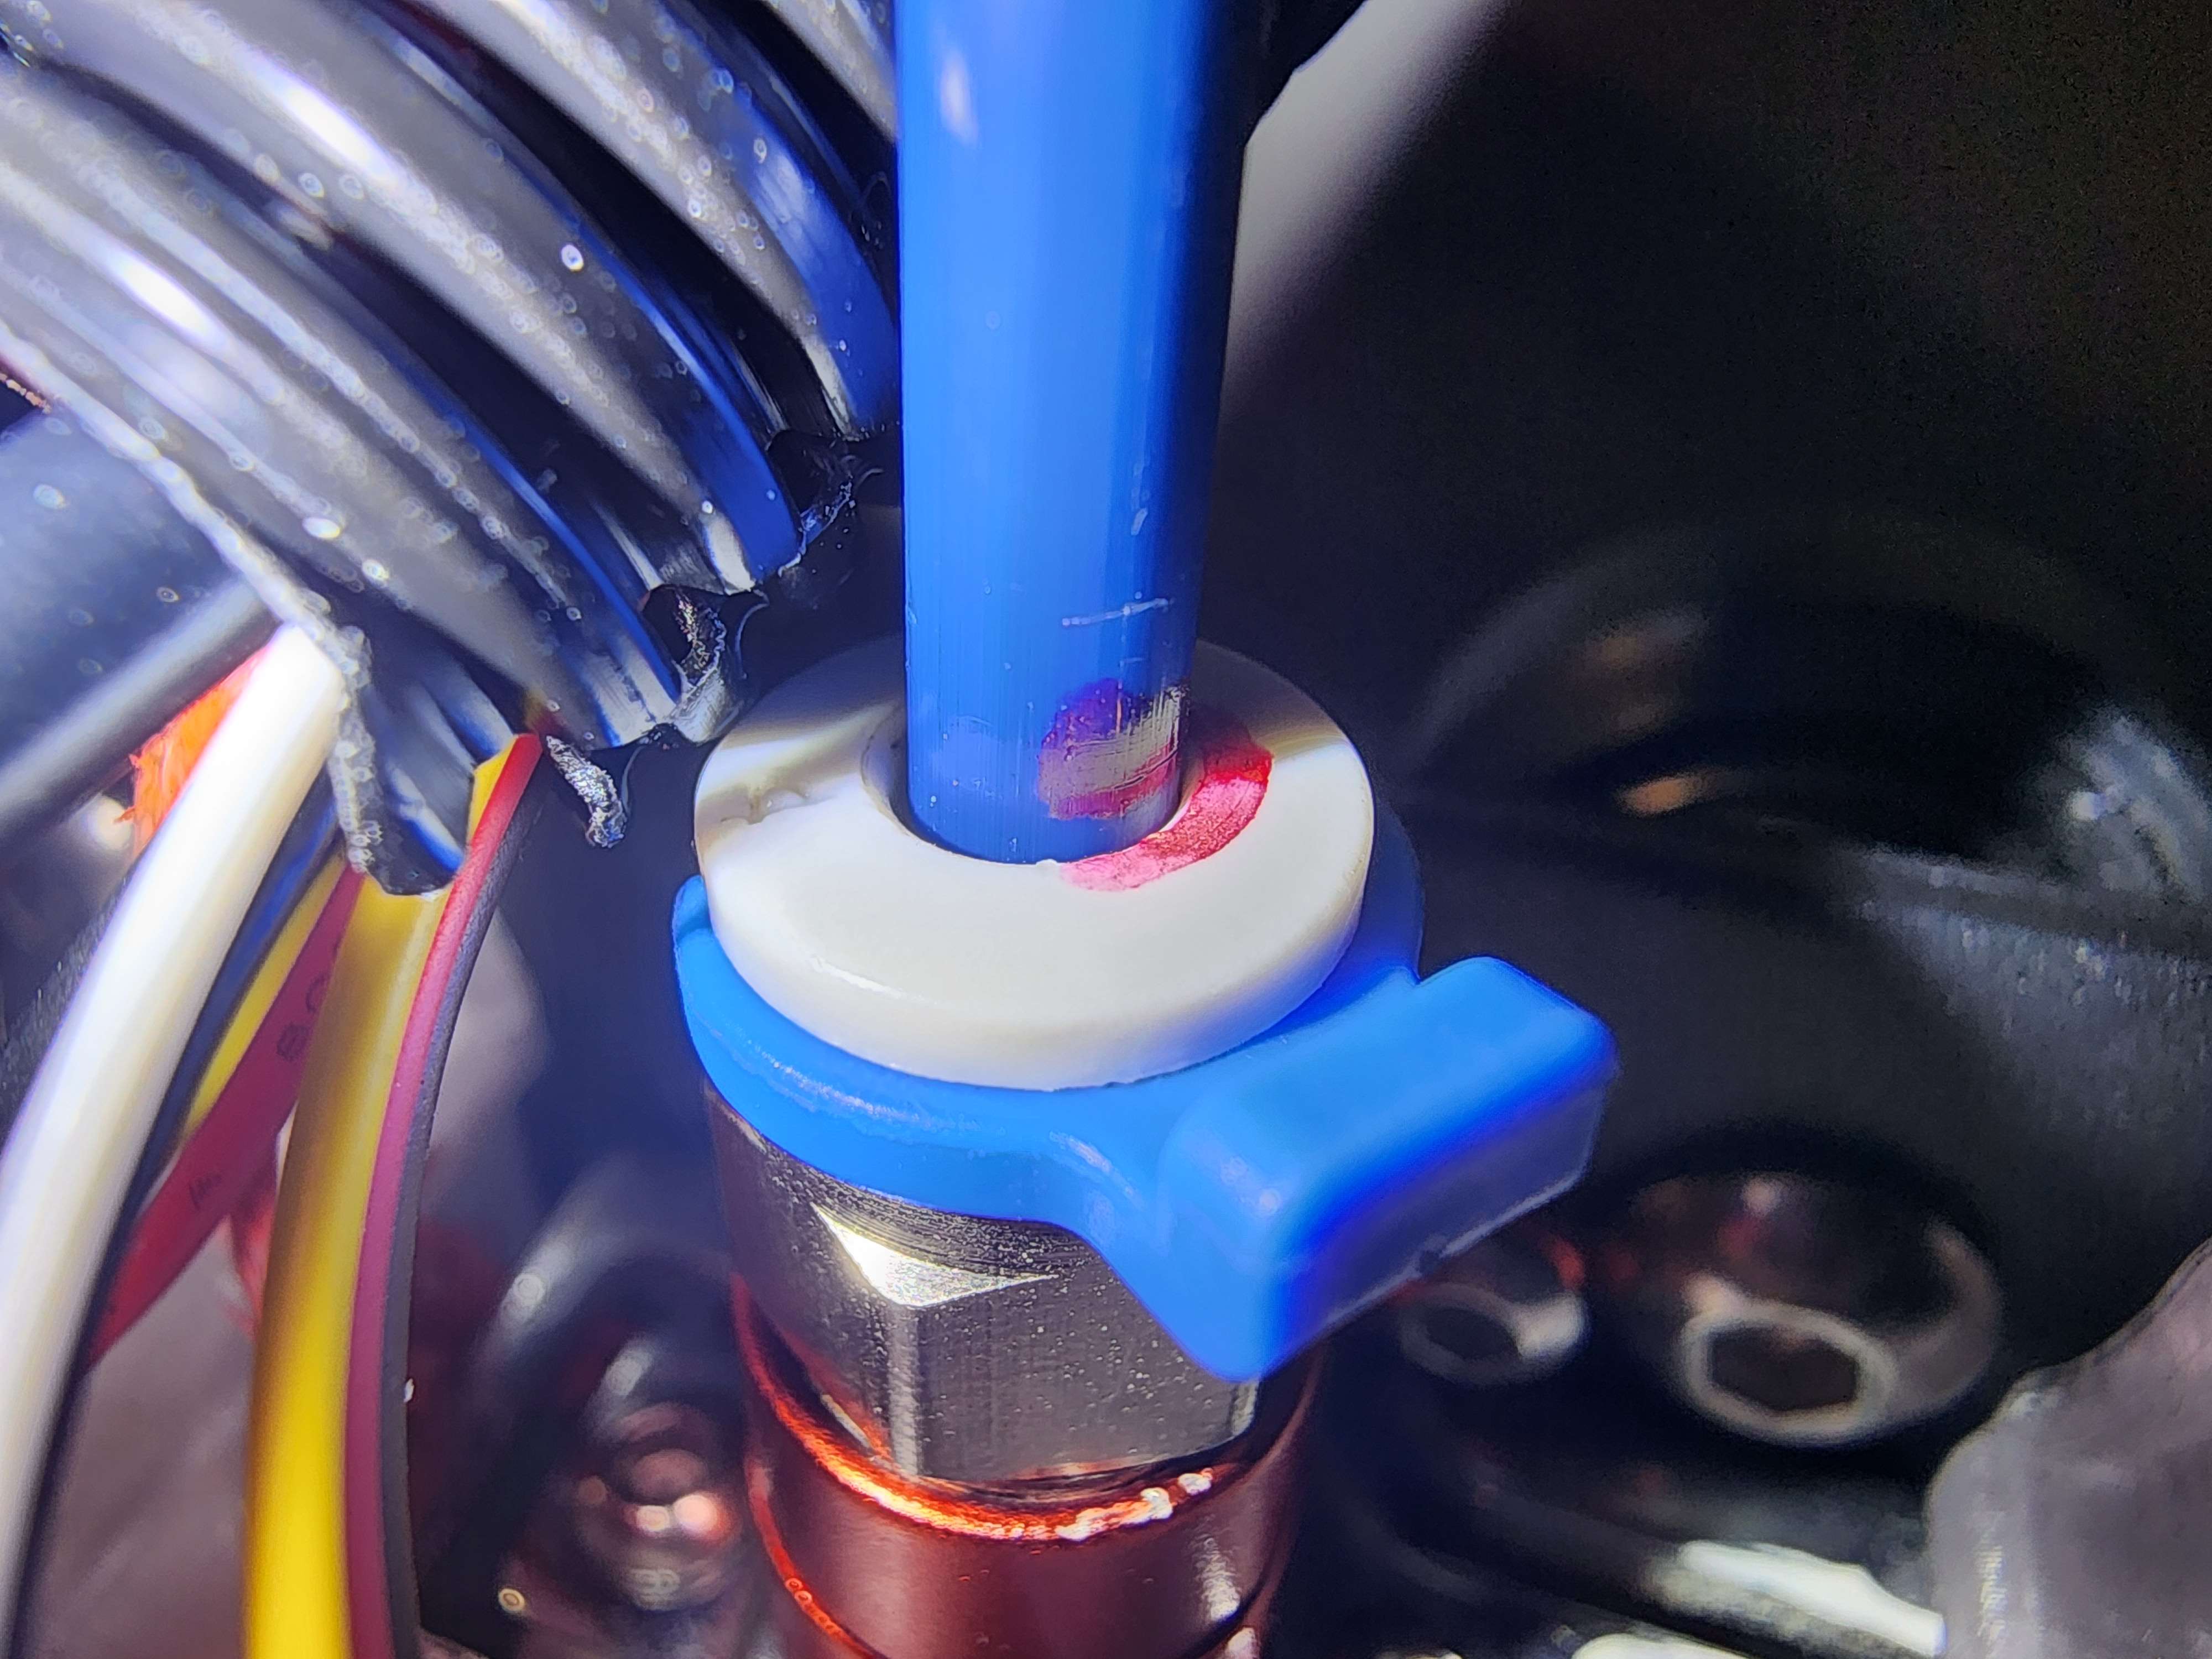
With the heat block at 100C, I first loosely attach the nozzle, then insert the Bowden tube so its against the nozzle. Since I'm hand feeding filament, I'm only using ~10cm of tubing. For photographing purposes, I put a small notch on the tube at the top of the coupling (not visible in this photo). Then, with the coupling depressed, I finger tighten the nozzle, pushing the tube out slightly.
Here you can see that the nozzle is not getting tightened against the heat block (the small gap between the face of the nozzle and block); this verifies the nozzle is flush against the heat break.
I've circled the notch mentioned previously - this shows that the nozzle was indeed pushing the tube out of the coupling, and should verify that there is no space in between the bowden tube and the nozzle inside the heat break. With all this verified, I use a wrench to tighten the nozzle ~1/4 of a turn without depressing the tube coupling. This should ensure a tight mate between the tube and nozzle. I also put another mark on the tube at the coupling to make sure it does not move during the test, and reinstalled the fan shroud.
3. Hand feed filament
I'm quite frustrated because at the time of typing this I've repeated the above steps twice now, because when I went to hand feed the filament it instantly became clogged and I was not able to get any good data, but finally on the third attempt I've got a solid clog. I'm waiting for the hotend to cool off so I can remove it and get some pictures. Meanwhile, I'll explain that the hotend was heated to 200C and I hand fed some filament through it. As stated, the first two times it clogged instantly, but even when I was able to get filament to run on the third try it was incredibly difficult, when it has always been very easy to hand feed PLA at this temp. (When I did this test earlier, I tried increasing the temp to 240C, which made it a little easier to feed and prolonged the clogging slightly, but ultimately ended the same.) Eventually, it got to the point where I was almost breaking the filament trying to force it through, until I couldn't get any more to go at all. I'd guess this was maybe 20cm of filament.
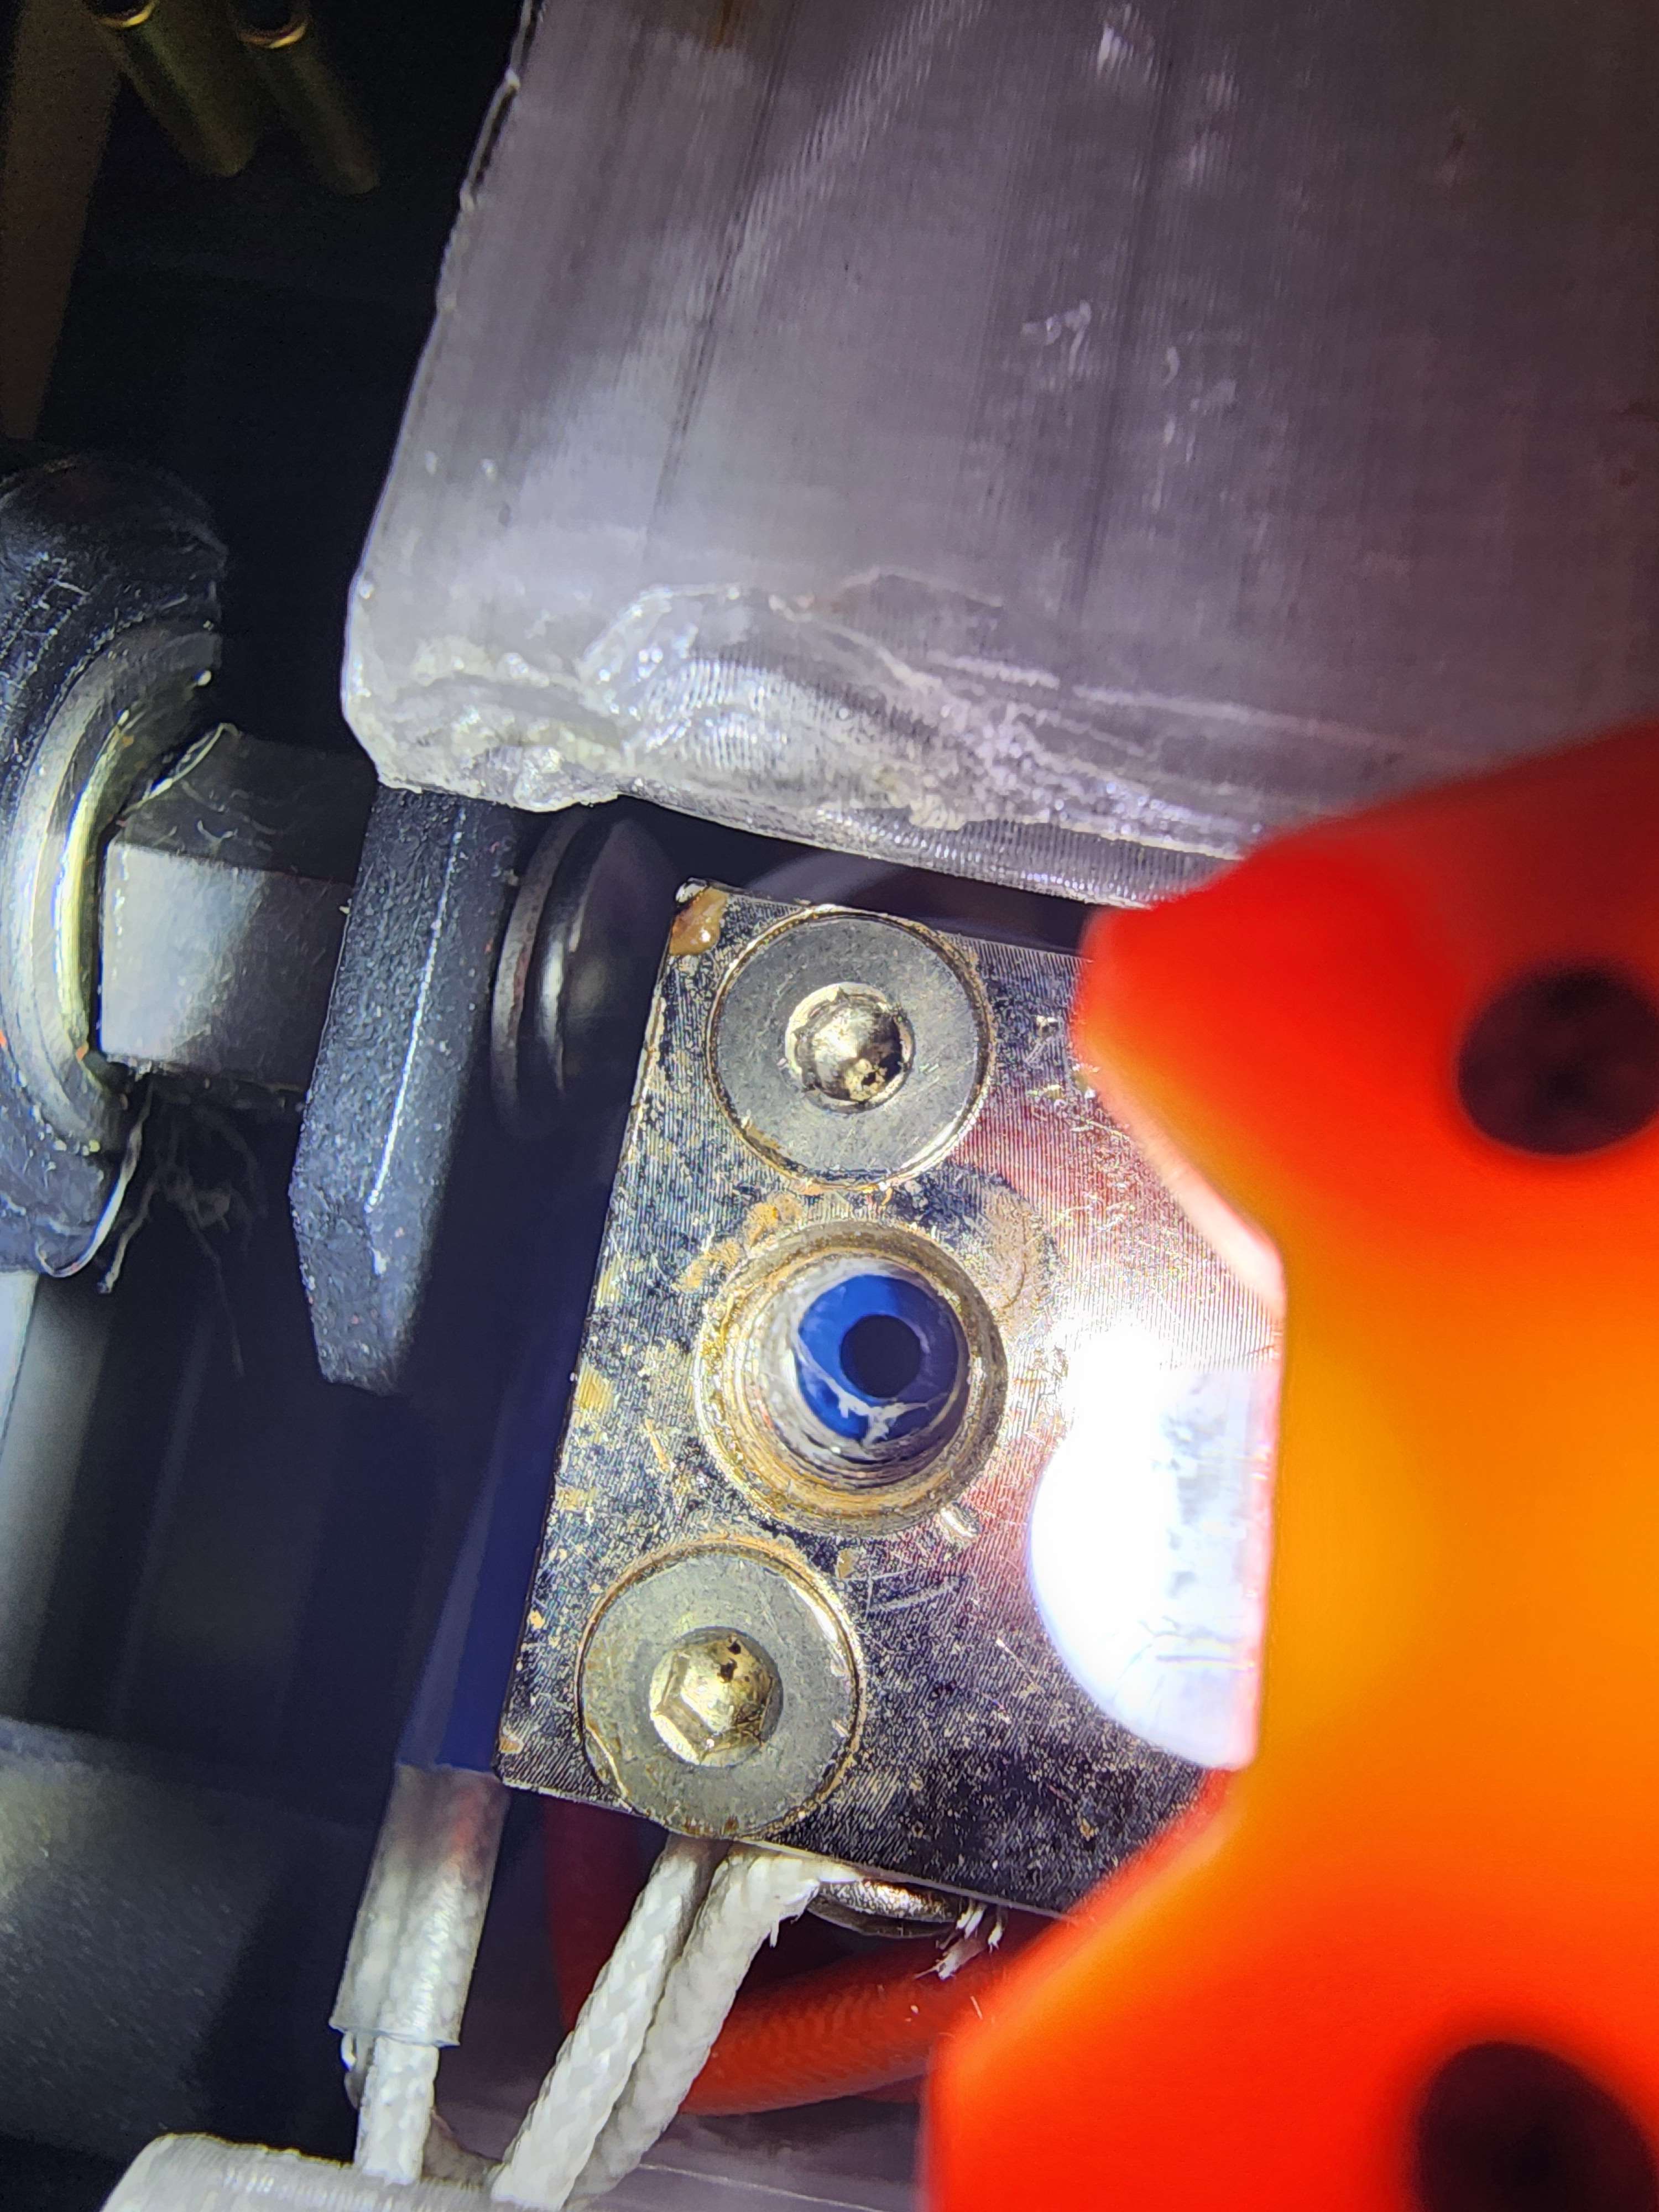
Hotend is cooled off, I managed to removed the nozzle, clog, and bowden tube all in one piece so that is awesome. This is exactly what I've been experiencing over and over again:
A clog forming between the nozzle and bowden tube, filling the diameter of the heat break.
The Bowden tube has been pushed out of the coupling by about the thickness of the clog. It should be noted that the coupling was actually replaced a few weeks prior to the problem starting, but I've since tested both another new coupling as well as the one that was originally replaced, and all three behave the same. I can also support most of the printer's weight by pulling up on the Bowden tube. Thus, I believe the slipping coupling to be a symptom rather than the cause.
This is what my heat block looks like after I repeated the test with some gray PLA. (A different nozzle as well as a different coupling was used for this test.) I noticed when putting the nozzle back on that it was really difficult to do so, and it seems like this could be why: filament making its way into the threads during the clog. (I guess my previous statement of the block being cleaner than it looked was probably false...) During earlier testing, I've soaked and torched the heat block to make sure this buildup wasn't causing the clogging, but again it seems to be a symptom rather than the cause.
The two clogs on the left are from earlier tests using the printer's extruder, the two on the right are from tonight's hand fed tests; note the difference in thickness of the clogs, the extruder is much more capable of pushing through the clog than I am which results in the clog getting much larger before failure. It should be reinstated that this exact result is prevalent across multiple filaments and nozzles. I was not able to get such clear results of what was happening when I had the all metal heat break(s) installed, and unfortunately I don't have the time tonight to swap one in, but it was clogging with more or less the same behavior, so I'd have to assume it was clogging between the Bowden tube and heat break. Before the hotend was modified, all of the common steps were taken to verify the internal bowden tube was functioning properly, and the bowden tube installed now is probably the third one that I've cut off of a brand new Capricorn tube since this problem began. I'm considering re-modifying the hotend to work how it did stock, but again it was clogging when it was set up the original way so I don't think this is the issue. I'll probably try it out tomorrow if nothing else gets me anywhere,
I have to go to bed before I can continue any more testing, but I'll get back to any comments or advice as soon as I can tomorrow. Yesterday was the first day I managed to pull one of those perfect clogs out, now that they've been coming out consistently like that I feel I'm much closer to finding the problem than before. Please let me know if anything needs to be clarified or if I missed anything, my hope is this thread (and my suffering) might help someone with a similar issue.
- What causes this on PLA? Too little cooling? Or possibly too much??
Anyone have any idea what might cause this sort of issue on PLA? I run into it frequently, but pretty much only when all of the following points are true:
- the print has multiple parts, so the extruder spends a decent amount of time off of any given part (only one part from this print is pictured)
- the affected part(s), like the picture above, have a relatively steep outward overhang, extending over the build plate
- the outward overhang part is relatively narrow, as seen from a top view
This is from a printer with a 4028 fan (i.e. pretty massive airflow, server type fan) so even the 35-45% (based on layer time) I have it currently set at is more than 100% with single/dual 5015's or etc.
I guess my other option is to try supports, but this doesn't really seem like a situation where supports should be needed. Anyone ever had a similar problem and solved it without just turning the speed waaaayyyyyy down?
- [Followup] Still working on that damn clogging issue!
Hi all. This is an update to this post. I don't know what else the community can do to help, but I figured I'd throw some more content up there and give something bored people to look at.
Since the last update on that post, I tried working on the printer in freezing temperatures (not really but it's cold in this house) with extremely precise practices on assembling the hot end (the same hot end I had haphazardly assembled dozens of times and printed with zero issues) and yielded zero progress. Today, I tried a brand new PTFE lined heat break, along with a brand new Capricorn Bowden tube (I already had one but I needed more tubing for the heat break). Clogging in the same exact way in roughly the same amount of time as every other attempt. It's as if I've not tried anything, literally nothing is effecting the results.
I considered ordering a fancy micro-swiss or ed3 hot end, but at this point, including the stock hardware, I've gone through 6 heat breaks, 3 heat blocks, a half dozen nozzles and a foot of Bowden tubing, none of which did anything to fix my problem (or even make it worse). I would look to the extruder, but I outlined in the previous post the testing I did to rule that out (able to run >1m of filament at high and low speeds through the Bowden tube).
I'm at the end of my wits. Perfectly good printer cranking out multiple high detail prints a day, now completely useless over something so stupid as clogging. Where the hell else can I look? Could it possibly be some sort of software/firmware issue, where Klipper isn't sending or receiving the right commands or something? I know my slicer settings are at least good enough because I've tried both prints that have completed dozens of times as well as new prints with drastically reduced retraction. Do steppers need to be tuned over time? I don't think it makes sense that after a year it'd suddenly become so uncalibrated it's unusable, and when I tried calibrating it before I was just unknowingly calibrating against mild clogs, but I don't know where else to look.