You could say the same about C and D batteries too.
They're all 1.5V
Interesting idea,
But search sites currently can't find anything in lemmy.
So how will they link to this?
Yeah, have you seen the size of those? Those are chem lasers in order to get the wattage needed to destroy something.
Plus you need the electronics/mechanics to track the device perfectly to keep the laser on target in order for it to do damage.
All completely unnecessary to drop a small drone out of the sky.
WTF, how can they just make a change like that, and it get approved to be on the road?
Youtube comment,
Tesla that crashed into a pole, it was on fire, and the driver was trapped behind the laminated glass. Scary situation.
The first in crew that responded had a firefighter try to break the glass with a conventional window punch device, that didn't work.
Then he tried smashing it with some forcible entry tools, that didn't work either.
The driver ended up dying. It took 45 mins to extinguish the flames and 15 mins to get the car doors open.
Nah, lasers too big. It would be a simple birdshot shotgun. Its detection and aiming.
When they are high up, they can be hard to spot and hear.
But a pair of sensitive mic's and a camera designed to look for them could easily be paired with some AR glasses.
What sucks is that us hobbist's can't get FPV, motors, ESC's, or batteries at reasonable prices (if at all)
The reality of it, is this is short lived.
Anti-Air meant for small drones like this is coming and soon.
And it will shut these down quickly.
Yeah, that isn't going to work, because either
- !>25% of your population doesn't believe women have that right
or
- Your countries existing laws give too much voting power to a minority
Vote with your wallet
I did.
I bought my 3080 back in 2020, because I knew AI was the future of graphics, based on all the R&D and white papers nVidia was pumping out up to that point.
No regrets.
Not my problem nVidia was the only one to invest in the tech, while AMD relied solely on TSMC to shrink their dies.
It has nothing to do with brand loyalty or fanboys or any of that shit.
It's just straight up better tech.
hahaha... it saddens me that only those >30yrs old may get this.
Dude,
Close down /m/internet and /m/science so that someone else can create it and properly moderate it.
UPDATE:
Ernest update -> https://kbin.social/m/kbinMeta/t/875274/RE-Is-Ernest-still-here
We'll stick here and wait it out, and see if it becomes more stable.
Still no talk from Ernest about expanding out a team for something as big as kbin.
But hopefully it works out.
My point is simple.
Hydrogen derived from natural gas can not be used in fuel cells. Only hydrolysis hydrogen is viable.
It is one of 'many' reasons why hydrogen fuel will never be a thing.
-
Along with Hydrogen seeping through everything
-
Along with Hydrogen embrittlement
The energy efficiency loss to convert Solar/Wind/Nuc -> Hydrogen -> Mechanical or Solar/Wind/Nuc -> Hydrogen -> Electrical -> Mechanical
Will never be cost effective compared to Solar/Wind/Nuc -> Electrical(batt) -> Mechanical
Hydrogen has been known to man for a 1000 years, and yet
Gobal International WARS have been fought in the past century along with massive geopolitical maneuvering and trillions upon trillions of $$$ spent on the energy sector.
Do you really thing we'd be spending the $$$ we do for deep sea drilling if hydrogen was even close to being a viable resource?
No new technology has been developed that makes hydrogen useful. No. Fuel Cells are not it.
There just isn't enough energy gained by connecting Hydrogen -> Oxygen no matter what process you come up with.
Unless we find a way to fuse hydrogen together, hydrogen is a dead end and always has been.
Link to new magazine
With the talk of Erenst (The solo guy running kbin) missing in action, there's talk of communities migrating over to other instances that are maintained by more than 1 person.
mbin is a fork of kbin that is actively being worked on by more than 1 person.
Largest instance currently is https://fedia.io/
I've created a backup magazine for functional print there in case this all goes belly up.
Feel free to create accounts where you see fit, and sub to that magazine as a backup.
Some topics below on the subject,
https://kbin.social/m/kbinMeta/t/873938/Is-Ernest-still-here
https://kbin.social/m/kbin/t/873855/Unmoderated-and-now-extremely-delayed-federation-is-it-time-to
https://kbin.social/m/SquaredCircle/t/873700/MOVING-UPDATE-pt-2-Electric-Boogaloo
So how do you move a kbin magazine over to a new instance like fedia.io?
Most people don't even know the difference between congress and the senate.
Nope those all contain trace hydrogen sulfide.
You can't use natural gas hydrogen for a fuel cell.
They can't remove enough sulphur from it, and even a trace amount will destroy the fuel cell.
a fine in that amount would “crush most small businesses.”
Like it should... you dingbat...
Why do these idiots think they need to "save the businesses!"...
You want your economy to do well? Then make fair laws that attract educated people instead of pushing them away,
and provide a good infrastructure.
Businesses will then look after themselves fine.
This is a fully 3D printable clamped under desk drawer. What makes this drawer different? Well, Because it's clamped, you don't need to ruin the bottom of your desk with screw holes!
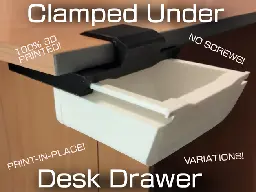
This is a fully 3D printable clamped under desk drawer. What makes this drawer different? Well, Because it's clamped, you don't need to ruin the bottom of your desk with screw holes!
Alright this project is growing.. needs a new description. I recommend printing the drawers laying bottom down with tree supports, or on their back. Either way should work, but bottom down will use less support material. To free the pins in the back after printing, place your fingers behind the pi...
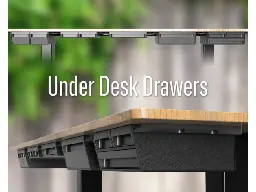
Alright this project is growing.. needs a new description. I recommend printing the drawers laying bottom down with tree supports, or on their back. Either way should work, but bottom down will use less support material. To free the pins in the back after printing, place your fingers behind the pin and give it a few sharp taps with something solid, back of a screw driver worked for me. -The chassis print best on their back. You can fit everything onto one 250 cubed build plate as shown. If you are working with a printer with less than a 250 cubed plate, try the Slim Stack or the Split Body, they both will happily print on a machine as small as 200. From left to right in the top of the photo, we have the Big Double (Big Double file and print two Big Double Drawers) Slim Double (Slim Double, print two Slim Double Drawers) Slim Single (Slim Single file and Slim Single Drawer) Big Single (Big Single file and Big Single Drawer) Slim Triple (Slim Triple file, two Slim Double Drawers and one Slim Single Drawer) Not shown is the Split Body, which for now is just the Slim Triple. Also the Slim Stack, which is two Slim Double drawers on top of each other. To assemble the Split, print the Split Chassis L & R, the Split Bottom Drawer L&R the Drawer Tie, and TWO of the Body Ties. I recommend using your favorite relatively thin glue to adhere everything together, then print two Slim Single drawers to fill in the top. I am working on a detailed PDF like my Club and Store models have for this project, to provide more detailed instructions on printing, running through settings and assembly. Its just taking a while, as the project grows so do the instructions. v1.1 01-08-2024; Chassis modified to be printed more reliably v1.15 01-10-2024; Drawer pulls modified to print with less support if in horizontal orientation and no support if in vertical orientation Buy me a coffee :)https://www.buymeacoffee.com/godsci Patreon:(project videos, commercial salable files, upcoming projects, requests)https://www.patreon.com/GodardScientific
This a remix of trentesous' very good foldable tripod Version 2. I remade the phone mount to rotate, allowing for both landscape and portrait modes. Find the original here: https://www.thingiverse.com/thing:2862445 Printing tips: Make sure to enable supports but use support blockers for the threaded...
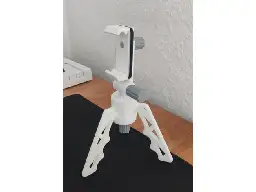
This a remix of trentesous' very good foldable tripod Version 2. I remade the phone mount to rotate, allowing for both landscape and portrait modes. Find the original here: https://www.thingiverse.com/thing:2862445 Printing tips: Make sure to enable supports but use support blockers for the threaded bits The orientation of the parts should be as shown in the screenshot above I suggest using Gyroid infill with a high density of \~75 - 50% for the screws and \~25% for the rest
Parts for cable management under a desk. They are screwed to the desk and use tie wraps to fasten the cables. Added 4,5 and 6 Cable holders. Added Samsung Portable T7 SSD Drvive Holder Added regular SSD Drive Holder
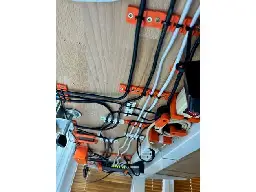
Parts for cable management under a desk. They are screwed to the desk and use tie wraps to fasten the cables. Added 4,5 and 6 Cable holders. Added Samsung Portable T7 SSD Drvive Holder Added regular SSD Drive Holder
USB-Cable-Holder for Ikea Skadis Wall. Standalone with little top Tray or for using as Addon for: https://www.thingiverse.com/thing:6320736 [works as addon only with the horizontal one obviously] Technical Data: i've only tested this with a cable length of 1m rolled cable should have a diameter betw...
![Skadis-USB-Cable-Holder [4x] by DsK_Printing](https://lemdro.id/pictrs/image/6ea7372a-78ab-4100-a22d-9a4bbfa14834.jpeg?format=webp&thumbnail=256)
USB-Cable-Holder for Ikea Skadis Wall. Standalone with little top Tray or for using as Addon for: https://www.thingiverse.com/thing:6320736 [works as addon only with the horizontal one obviously] Technical Data: i've only tested this with a cable length of 1m rolled cable should have a diameter between 50-60mm Print Settings i've used: 0.2mm layer height no supports needed 15% infill PLA see slicer pictures for print orientation
Universal holder for any cordless drills and tools. I used it mainly for Makita, but other power tools should fit as well of course. The following Makita tools have been tested so far in the 40mm version: Makita DTD171 Makita DDF484 Makita DDF484B Makita DHP484 Makita DDF459 Makita DHP481 Makita DTW...

Universal holder for any cordless drills and tools. I used it mainly for Makita, but other power tools should fit as well of course. The following Makita tools have been tested so far in the 40mm version: Makita DTD171 Makita DDF484 Makita DDF484B Makita DHP484 Makita DDF459 Makita DHP481 Makita DTW300 Makita DTW302 Makita DHG180 Makita DHG181 Festool T18+3 Milwaukee 2553 M12 Fuel \\ Milwaukee 2504 M12 Fuel \\ DeWalt DCE530 \\ DeWalt DCD771 \\ (seems also to fit in 35mm) DeWalt DCF887 \\ (seems also to fit in 35mm) DeWalt DCF885 \\ (seems also to fit in 35mm) DeWalt DCD985 \\ Surebonder Ultra DT-3100FAMZS \\ Porter Cable PCC601 Porter Cable PCC641 The 35mm version fits good for: Makita DDF487 Makita DHP487 DeWalt DCD778 \\ The wide version fits: Makita DWT700 \\ Makita DWT701 \\ Ryobi PBLIW01 \\ Smaller tools will probably better fit in the smaller holder with a 35mm cut-out. If someone needs a different measurement, feel free to leave a comment, I'll see if I can implement this. Printing Very easy, no supports needed if printed standing. I used PETG for my prints and three walls with 20% infill. This is very solid. If you want, you can print it with 100% infill and get it even stiffer. But you will need \~220g of filament for this. ;) Update 04.05.2023 I've added another design for the holder, based on the idea of @mnemic. I has the same sizes as the other, but saves even more filament. Update 06.10.2023 I've added a wider version of the holder, for Tools like the DWT700 or DWT701. This version is identical to the 40mm default version. Only difference is, that that the inner width is 81mm instead of 70mm. \\ = Information from users who printed the models.
Whipped up this quick wall mounted spool holder. made to accommodate 1.1kg spools and under at 100% scale and should accommodate 3kgs by just upscaling. feel free to remix and repost all I ask for is oc credit.
Whipped up this quick wall mounted spool holder. made to accommodate 1.1kg spools and under at 100% scale and should accommodate 3kgs by just upscaling. feel free to remix and repost all I ask for is oc credit.
Update 2023-11-27: This thing is Version 1 of my adaper. I have now designed Version 2, with the following improvements: the smartphone's center of gravity is now directly above the mounting screw, which gives the tripod a more secure stand, The tripod adapter is now even more compact and lig...
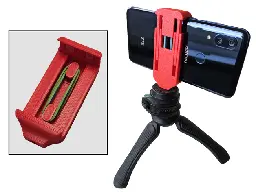
Update 2023-11-27: This thing is Version 1 of my adaper. I have now designed Version 2, with the following improvements: the smartphone's center of gravity is now directly above the mounting screw, which gives the tripod a more secure stand, The tripod adapter is now even more compact and lighter. You can download this new version 2 for free here or here. Summary (Version 1) This compact tripod mount can hold almost all smartphones with its clamping range of 64 to 84 mm. It can easily be printed as a single part (“print-in-place”). No other components are required other than a rubber band. For smartphones with slippery sides without a case, self-adhesive silicone bumpers can optionally be glued in. Printing Instructions: Use a 0.4mm line with a layer height of 0.2mm. Print the object in the specified orientation. If possible, place the Z-seam as shown in the image above. There are two print files, with 0.3mm clearance and with 0.25mm clearance ("...tight-fit"). If your printer prints precisely, I would use the latter. Assembly Instructions: Before using the adapter, the assembly of one or two rubber bands is required. Using two rubber bands instead of a single one can increase safety. Smartphones with silicone cases usually hold well. For smartphones with slippery sides without a case, recesses have been provided into which optionally cut self-adhesive silicone bumpers with a thickness of 2 mm and an edge length of 7 mm can be glued (see pictures above). Instructions for Use: Before inserting the smartphone, please check whether the rubber band(s) are still intact. The smartphone could fall out if the rubber band(s) break. The adapter has a printed thread to accept the mounting screw. The screw hole is 11mm deep. If your tripod has a removable lock nut on the mounting screw, you can remove this nut and thus increase the usable thread length of the screw. This increases stability. See picture above. The printed thread can wear out. Check the screw connection for tightness.
This is a fully re-modeled build of a MicroSD case inspired by Kozalakis's one, borrowing some ideas from Kroki's remix of it. I didn't actually use any of their source, rather building from scratch using SD/MicroSD card dimensions. This version relies on fairly close tolerances, so it may be a bit ...
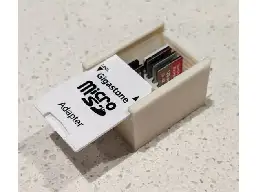
This is a fully re-modeled build of a MicroSD case inspired by Kozalakis's one, borrowing some ideas from Kroki's remix of it. I didn't actually use any of their source, rather building from scratch using SD/MicroSD card dimensions. This version relies on fairly close tolerances, so it may be a bit temperamental on some 3D printers (Details below). The main differences from the other two: The case holds 10 MicroSD cards (2 x 5) There are registration tabs in the slots, so the SD adapter lid should only go in with the label side out and the connectors on the inside of the box. The SD adapter should register with the card retention tab on the inside of the slot (The original design used the write-protect tab slot to register the card). Depending on the material used and tolerances, this may be tight or wear out after a while. The SD adapter can be pushed-out from the connector end (the main reason for Kroki's remix). The model is intended to be printed with the notched “connector end” of the case DOWN. The print should not need any supports as all overhangs are either short (i.e. inside the MicroSD slots) or gradually sloping (the inside-top of the box). I added a second version that has added 0.2mm thick “frog toe” sprues on the outer corners of the base. These may assist with bed adhesion and preventing curling during the print. The sprues are more easily removable than a conventional brim addition and use less material too. This was all done using a free OnShape account and the model source is here
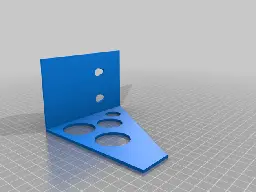
This is a strong corner for fixing three planes. Print as in the screenshot. Added a new v2.1 version! The area of contact with the planes has been increased by adding small overhangs that do not affect the print quality. Added a new v2 version! Removed overhangs for simpler print quality. Increased...
This is a strong corner for fixing three planes. Print as in the screenshot. Added a new v2.1 version! The area of contact with the planes has been increased by adding small overhangs that do not affect the print quality. Added a new v2 version! Removed overhangs for simpler print quality. Increased base area for better adhesion.
Diese Halter gibt es im Versandhandel um Freundschaftsbänder zu knüpfen. Ich war neugierig, ob es damit besser funktioniert und habe mir (bzw. Töchterchen) einen gebastelt... "Brauchen" tut man das nicht. Es ist ein wenig einfacher, gerade für die jüngeren, den Überblick zu behalten, welcher Faden a...
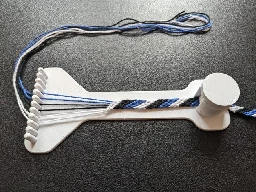
Similar tools are sold online, pretending to help creating friendship bracelets. I was curious, so I created one for my daughter. Even not really needed it helps to keep the right order of the strings, which helps the younger ones... You should still attach the initial end of the strings somewhere so you can give some tension on the strings... Due to the thread this required 0.2mm when I printed it... Have fun!
I had an old USB Oscilloscope (StingRay), it's 20+ years old now.
Bought a OWON HDS242 with the hope that I could view some stuff on it's screen, but still hook it up via USB to the computer and do some voltage data logging. It doesn't seem to work like I would like it to.
So I've learned what I want is a Data Logger and not an Oscilloscope.
Can anyone recommend a good USB Data Logger that won't break the bank?
Decent bit ADC, and something that can get down to the 1us.
Doesn't need to be high voltage.
Cheers,
It helps categorise, manage, and present content effectively, commonly found in applications. About 130mm in width x 30mm in height. More designs on Printables: https://www.printables.com/@ChrisTech Additionally, take a look at my latest model: https://www.thingiverse.com/thing:6333750 Suggested pri...
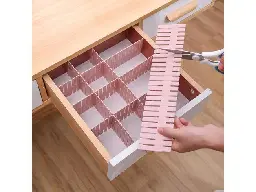
It helps categorise, manage, and present content effectively, commonly found in applications. About 130mm in width x 30mm in height. An add-on is an optional component, feature, or extension that can be integrated into an existing system. More designs on Printables: https://www.printables.com/@ChrisTech Change Log: 7 November 2023 Create an extension part to link with another partition. 15 November 2023 Fine-tuned the design's tolerance.
Find out everything you need to know about the battery box on my blog: https://nerd-corner.com/3d-printed-battery-container-for-cr2032/ or https://nerd-corner.com/de/3d-gedruckter-batteriebehaelter-fuer-cr2032/

Find out everything you need to know about the battery box on my blog: https://nerd-corner.com/3d-printed-battery-container-for-cr2032/ or https://nerd-corner.com/de/3d-gedruckter-batteriebehaelter-fuer-cr2032/
Redesign of a simple micro SD card organizer, based on the original MicroSD Card holder by FritoBandito. Created a new model in Autodesk Fusion 360. Redesigned the slots for easier card removal. Print with 0.2mm layer height

Redesign of a simple micro SD card organizer, based on the original MicroSD Card holder by FritoBandito. Created a new model in Autodesk Fusion 360. Redesigned the slots for easier card removal. Print with 0.2mm layer height
This is a wall mount I designed and made for the Meta Quest 3 VR Headset; I also made a wall mounts for the Quest 1 and 2 when they were released, (see other designs) and was hoping to have this wall mount compatible with the Quest 1 and 2, but the design of the Quest 3 prohibits that. I have added...
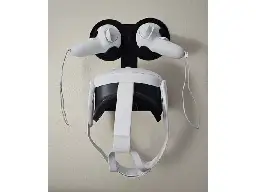
This is a wall mount I designed and made for the Meta Quest 3 VR Headset; I also made a wall mounts for the Quest 1 and 2 when they were released, (see other designs) and was hoping to have this wall mount compatible with the Quest 1 and 2, but the design of the Quest 3 prohibits that. I have added three new STL files to make printing easier, one is a top part, and the other a bottom part, the other is a skinny top to fit on tiny printer bed; see in print section below. Like my other Quest wall mounts, this works well, but please be gentle with it as any damage to your headset is on you. I designed this to mount to a wall STUD with sheet rock / dry wall screws; (You can use on Wood piece or wall with the correct anchors MAKE SURE YOU DO NOT SCREW INTO A CABLE OR PIPE OF SOME KIND. IF YOU ARE NOT 100 PERCENT SURE WHAT TO DO, GET HELP INSTALLING THIS The hook on the bottom is hold the USB C cable when the unit is not being charged. Also, please checkout and subscribe to my youtube channel, youtube.com/10p6 \\\\ I have changed the license agreement for this model to allow remixes and sales.. The rules: 1 - Keep the 10p6 Logo (if you do not like it, do not do a remix), 2 - DO NOT USE THE META LOGO AT ALL (That is a registered trademark and I do not want it on my models / remixes.) 3 - Make sure you list and link your remix to this model here on Thingiverse and nowhere else; (This is my model you are altering, not a model you are creating.) 4 - If I find my model files or remixes of it on any other site I will have them removed. I have also allowed my model to be 'Printed' and sold online. Note that credit for any sale listing must show the model was designed by 10P6 and must not be made to look like you designed it. You are responsible for the quality of the prints, and any design changes made as I know my model works perfectly. DO NOT REMOVE THE 10P6 LOGO. THESE MODIFIED LICENSES DO NOT ALLOW FOR THE ELECTRONIC DESIGN FILE/s, OR REMIXES TO BE SOLD OR SHARED ON ANY SITES OTHER THAN THINGIVERSE. MY PHYSICALLY PRINTED MODEL AND YOUR REMIXES CAN BE SOLD ON OTHER SITES, HOWEVER DO NOT SELL ANY MODELS / REMIXES EITHER DIGITAL OR PRINTED ON CULTS3D AS THE OWNER THINKS COPYRIGHT THEFT IS OK WHICH IT IS NOT. \\\\
This is an automatically latching lock which is powered by a Micro Servo SG90 9G. This makes it easy and inexpensive to interface to most microcontrollers such as Arduino. It is designed to engage with a pin of 3mm to 4mm diameter (not part of this model). When the pin enters the slot, it causes the...
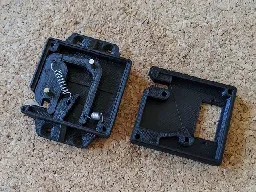
This is an automatically latching lock which is powered by a Micro Servo SG90 9G. This makes it easy and inexpensive to interface to most microcontrollers such as Arduino. It is designed to engage with a pin of 3mm to 4mm diameter (not part of this model). When the pin enters the slot, it causes the mechanism to latch. To unlock it, the servo is driven through a range of 45 degrees, which causes the lock to release. The mechanism is designed to have a large mechanical advantage, so it should be able to cope with quite a bit of load without stalling the servo motor. We are approaching Halloween as I write this, so perhaps you could use it to drop giant spiders on unsuspecting guests :) You will also need: 2x 3mm x 15mm brass shaft (or similar) 2x M3 x 15mm screws to secure the housing 2x small springs Grease Use a drill to clean up the holes in the moving parts, so that they rotate very freely on the shafts. File or sand the parts to ensure they are smooth, and apply grease before assembly. Test the range of motion of the servo before assembly. You can actually test the complete mechanism is working well without the servo fitted. Push a screwdriver into the slot to make it latch, then use your fingertip to actuate the trigger. When you are confident that is operating smoothly, connect the servo to your Arduino (or whatever) to find its "rest" or "zero" position, then fit the servo horn in the correct orientation, then mount the servo and test in situ. I've attached a picture showing a view of the upper part of the housing viewed from below to show the proper orientation of the servo horn when the servo is at its "rest" or "zero" position. When the servo is driven through 45 degrees, it pushes against the "trigger" (the red part) causing the latch to release. Sample Arduino code is included (example.ino), showing how to drive the servo.
I was just playing around with printable trapezoidal threads and before I realized it, I had designed a large machine vise… The vise has a clamping range of 120x120mm. It is good for circuit boards because plastic is non-conductive. Standard trapezoidal threads (30° thread angle ) or ACME threads (2...
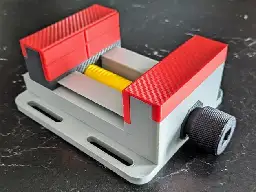
I was just playing around with printable trapezoidal threads and before I realized it, I had designed a large machine vise… The vise has a clamping range of 120x120mm. It is good for circuit boards because plastic is non-conductive. Standard trapezoidal threads (30° thread angle ) or ACME threads (29° thread angle) are very difficult to print in an upright position. The overhangs are not supported by the thread geometry. Therefore my thread has a thread angle of 42°. This can be printed upright at 0.12 layer height without using supports. Print all threaded parts in an upright position with a layer height of 0.12mm or smaller. All other parts can be printed with 0.2mm or bigger layers. Support is needed for the Slider and the Jaws. For the Base support is optional but recommended. The other parts do not need supports. I am using 4 walls, 5 tops, 4 bottoms and 10% gyroid infill. See my 3mf file for more details and change it to your needs. The 3mf file is for Bambu Lab P1/X1 printer but shows the orientation of the parts. Just to mention it - this is a large vice. It needs more than 0.5kg filament. The gap between the parts is 0.25mm for all movable elements. The pins have a smaller clearance (0.15mm) as those are a press-fit. If necessary they can be hammered in position. I was using some very cheap filaments that had large tolerances in diameter. In that case you might need to rework the holes for the pins with a drill (Ø4mm) and sand the sliding surfaces evenly. This should not be necessary if you use quality filament. For the sliding surfaces and the thread I am applying candle wax as surface treatment (just rub it on). Then you have a nice and smooth vice action.