Bat house built from salvaged lumber
Bat house built from salvaged lumber
Discover topics like woodworking, bats, conservation, diy, and the magic of the internet at Imgur, a community powered entertainment destination. Lift your spirits with funny jokes, trending memes, entertaining gifs, inspiring stories, viral videos, and so much more from users like jacobcoffinwrites...
There are bats living around my parent's house. I wanted to build them a house of their own. They seem to like the barn - we think the scratches on the wall below the eaves might be from bats landing and climbing their way up into shelter. They only seem to exist below the eaves, so I'm hoping that's a good sign that they'll notice their new house quickly.
If you've seen my other posts here, you'll know I try to make everything I build out of old materials, stuff I find on trash day, pull from construction debris, or get from my local Everything is Free page, so that was part of the challenge of building this one. I pretty much managed it - the only thing I bought new was the caulking I used to seal the joints, everything else, wood, stains, screws, bituthene, etc was all old stuff.
I started with a kind of motley collection of materials but I like the challenge of finding secondhand stuff that'll work. On the uphand, I didn't have to cut up bigger lumber just to make the spacers, they were all small scraps from other projects. I don't remember where I got the nice piece of half-inch cabinet plywood. The 3/8" plywood came from a fellow I met through Everything is Free, and the pine boards were found on trash day.
I followed this guide: https://www.mass.gov/doc/build-a-four-chamber-bat-house/download from the state of Massachusetts as closely as I could since we're in a similar region, though I had to make it slightly narrower than the specified 17.5 inches because of the dimensions of the 1/2" plywood. I also made the roof slightly wider, because the board was already that length and it seemed like it would offer additional protection, so no need to shorten it.
We had access to a laser cutter through a local makerspace, so my SO and I decided to burn a paisley pattern into the smaller panels just as a quick flourish. I'm actually very pleased with how that little detail looked on the finished version, and it's something I'll play with in future furniture building projects. The sides were slightly longer than the laser cutter's working space, so I had to carve a little of the pattern by hand, but once it was stained they blended in pretty well.
The instructions tell you to cut groves into the interior surfaces to make it easier for the bats to climb. For most of them I did regular horizontal lines, 1/4" to 1/2" apart, but I got bored a couple times and cut climbable murals instead. I tried to emphasize lots of horizontal handholds, and I made sure that each compartment got at least one regular 'ladder' too. Given that they seem to already be climbing the wooden siding of the barn, I think they'll still find this pretty usable.
The instructions all said to stain it with water based stain so the fumes/smell wouldn't bother the bats. I did all the interior surfaces with a can of expresso water-based stain and the outside surfaces with two coats of oil-based stain for improved water resistance (and because I ran out of the water-based stuff). I left all the panels leaning upright on our porch for several weeks so they could offgas with good ventilation, prior to assembly. All the stains came from Everything is Free.
I decided to stain the paisley panels with red mahogany stain and the rest with two coats of ebony to give them a little more contrast. This left the roof and front stained black for maximum sun-warming. On the front paisley panel, which had a frame around the pattern, I did my best to do the inside in red and the frame in black, to match the sides. It was all pretty much hidden by the very distinct grain that piece of plywood happened to have. A prestain might have helped, though I mostly wish I'd had more of the cabinet plywood I used for the upper front and back.
I started assembly by attaching the back to the sides, and started that by caulking the joint. The silicone caulking was the only thing I bought new for this project. I could probably have kept asking around until I found some, but I settled for giving the rest of the tube away on Everything is Free because I didn't think I'd use it for anything before it expired. The directions emphasized that you really want a good seal everywhere except the specified vents, because the bats need to be warm and dry, so I made sure to seal all the exterior joints well.
Once it was all assembled, I added a coat of oil-based urethane to the top and sides of the roof to help with water resistance. If it warped, that could allow drafts and additional moisture intrusion. I also added little bits of trim to the sides under the roof, after sealing that joint a second time.
We hung it partly using some metal strips my dad had from past projects, for attaching chimneys to the roofing around them. They were galvanized and a kind of corrugated pattern. I found two sets of two where the existing holes lined up, and drilled two new ones in each set so they all had four. Then I painted them and attached them to the back.
Another relative provided a scrap of bituthene which we stuck/stapled to the roof for additional waterproofing.
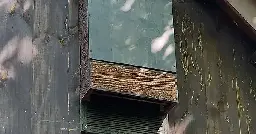
Once it was ready, I pushed it to the top of a tall ladder leveled it against the wall, and put two screws through each metal bracket, then two screws through the landing strip at the bottom, and two toenailed in through the vents on the sides. I'm told that was overkill but I really didn't want any bats we housed to fall off the wall someday. At this point, if it goes, it'll take the siding with it.
OMG loved your project. Keep on sharing these experiences ! Hope to learn more about all this DIY stuff until I become a lot more self-reliant or collaborate with other people.
I'm so glad! Always happy to talk about woodworking/general DIY stuff if you have any questions. Or if you want any ideas on getting started, advice on tools or where to find them, etc, I'm happy to yammer on about it.
Either way, I'll keep posting stuff. I've got a mid-century desk almost fixed and ready to give away, and all the cast iron parts from one of those park benches, just need to fabricate a replacement wood seat and back because the old ones rotted. Once I can get the desk out of my workshop I'll have a lot more space (until I find another project to take it up).
Great! I'm mostly a computer nerd so, I haven't develop any woodworking skills to say the truth. It would really help me if you could share the "ABC" or "Woodworking 101" 🙂 that way we can help introduce most of the newbies of the DIY communities to the kind of work you do.
And please, do share your desk repairing process ! Love those before and afters.