Uncle Bens
- News: California Psilocybin Legalization Campaign Cleared To Collect Signatures For 2024 Ballot Initiativewww.marijuanamoment.net California Psilocybin Legalization Campaign Cleared To Collect Signatures For 2024 Ballot Initiative - Marijuana Moment
California officials have cleared a campaign to begin signature gathering for a 2024 ballot initiative to legalize the possession, sale and regulated therapeutic use of psilocybin. It’s one of at least two campaigns in the state that are seeking to enact psychedelics reform through the ballot proces...
If you're in California, feel free to volunteer or at least seek out a petition to sign. Hopefully, it'll happen this time.
- (Full Text Copy) Shroomscout’s Comprehensive “Easiest Way to Learn Shroom Growing with Uncle Bens Tek” Instructions. (Parts 1-3)
----------------------------------------------------------------------------------- Pirates note: I will update this with new and/or original links as I have time. In the mean time, I have edited this document for brevity and omitted parts with broken links or if videos or pictures link to Reddit.
Original author: https://old.reddit.com/user/shroomscout
Editor notes:
- [+] <- Denotes omitted text for future editing reference
- This is a work in progress!!! ----------------------------------------------------------------------------------- Shroomscout’s Official “Easiest Way to Learn Magic Mushroom Growing with Ready Rice Tek” -----------------------------------------------------------------------------------
[+]
So, you want to grow magic mushrooms. You’re a bit confused, lost, or overwhelmed by the whole process, the many different Teks, or even the basics and where to start. You’ve come to the right place!
I’ll break this write-up into 4 main posts. At the bottom of each post will be a summary in bold.
Part 1: Understanding how mushrooms and mycelium grow (Very important, do not skip!)
Part 2: How to Inoculate Uncle Bens Bags (Inoculation & Colonization)
Part 3: How to Spawn to Bulk (Fruiting)
Part 4: How to Harvest, Dry, and Prepare for next flush (There will also be a TL;DR at the bottom of Part 4)
[+]
🍄 Part 1: How mushrooms and mycelium grow 🍄 -----------------------------------------------------------------------------------
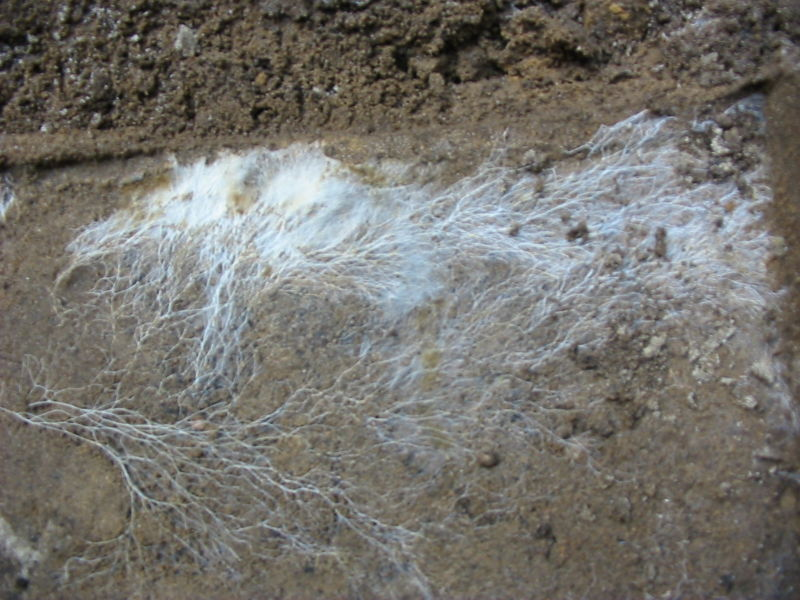
Background: Mushrooms are a unique organism. Many people think of them as plants, but they’re more closely related to animals and bacteria than they are plants. The part people know as the actual mushroom is the Fruiting Body, aka “the fruit”. These fruits are what we harvest and eat for the psilocybin compound. The underside of these fruits has gills that will drop spores. When two spores meet in moist, nutrient-filled conditions, they can germinate and create new mycelium. The bulk of the actual organism lives in it’s root-like colony of white “hyphae”, or microscopic thread-like roots, under the substrate that form the Mycelium (abbreviated as “Myc”): !mycelium
Mycelium can spread like a bacteria to create more of the organism, colonizing the nutrient-rich substrate until it’s ready to produce fruiting bodies (the mushrooms themselves) to spread it’s spores in the breeze.
Most ‘mushroom’ cultivation involves caring for the mycelium. Here's a great diagram of the life cycle of a mushroom!
The species you’ll be interested in is Psilocybe cubensis, aka P. cubensis or “cubes”. Though many mushrooms grow in a similar fashion, our focus is only on this species. Most of all psychedelic mushroom cultivation and ingestion involves “cubes”.
The life cycle of a cubensis fungus:
In nature, when two tiny microscopic spores from a P. cubensis mushroom meet in a warm, moist and nutrient-filled pile of cow dung, they germinate and begin producing mycelium. This network of white tendrils begins colonizing the dung from the inside, eating up all of the available nutrients and using the water and humidity to produce more mycelium to eat up more nutrients. As it grows stronger, it begins producing it’s own antibiotic properties so it can fight off other mold and bacteria. Eventually, it has colonized the entire dung of cow manure. What’s next?
Mycelium won’t produce fruiting bodies (mushrooms) until it has colonized the entire dung heap. Inside the dung heap, it’s cramped, there’s no airflow, and its moist. This species of mushrooms only begins producing fruiting bodies when it’s suspecting an imminent death, where it’s time to spread it’s genetics and GTFO. If you were a fungus, and your only drive in life was to keep your genetics alive somewhere, the easiest way to do that would be to create a mushroom, open up your gills, and drop your spores into the breeze so they can float over to the next uncolonized dung heap.
How does a mushroom decide when’s a good time to fruit? When the conditions are right. First, the dung must be fully colonized. Once the mycelium reaches the edge of the poo, now there is sunlight, fresh air, evaporation, etc. The mycelium waits for a cool rain, and lots of humidity from the rain evaporating off the surface of the poo, and then BAM: Mushrooms pop up, drop their spores in the matter of a few days, and move on to the next pile a few feet over, and the process starts all over again.
The Basics of cultivation:
For the indoor cultivation of mushrooms, you are trying to replicate this process.
P.cubensis mushroom spores can be legally purchased and posessed in “multi-spore syringes” (which are syringes containing clean water and microscopic black spores) in 47 states (sorry CA, GA, & ID) (more on that in Part 2). Some vendors are willing to ship to California, since there is no enforcement of spore syringes there, but order at your own risk. Most vendors won't ship to CA, GA, or ID. If you're in need of a spore vendor to get started, I'd recommend sporestock.com.
First: we need to get our spores to colonize something nutrient-rich to produce our mycelium. This is called “Inoculation”, or “inoculating” your spawn. Who likes working with manure? Though many growers today still use horse poo, the more popular option are grains. We’re talking Wild Bird Seed, Brown Rice, Rye Berries, popcorn, you name it. Make sure these grains are clean, have lots of nutrients, and some water/humidity, and your spores will germinate and cover the grains with a white growth of a mycelial network. But there’s an issue: Mycelium’s requirements (grains, nutrients, water, a decent temperature) are all the perfect breeding ground for mold, mildew, and other fungus. This is often the hardest obstacle to avoid in cultivation: contamination. So, you need to make sure that your grains are clean, contain moisture, and are very sterile. Contamination, or “Contam”, is the most common way a cultivation is ruined.
If you can avoid contamination in the inoculation/spawn step, you’ve mostly avoided any obstacles in your way. The next step is fruiting.
Second: now we need to grow the fruits! In cultivation, there are two general methods for forcing your mycelium to produce fruits: “Cakes” or “Spawning to Bulk”. Though we’ll go into these methods in Part 3, the basics are simple. The mycelium has fully colonized your grains 100%, as if they had colonized the cow dung in nature. There is nowhere left for the mycelium to colonize, so you need to simulate rain, fresh air, humidity, and a little bit of light. Boom! Mushrooms will grow from your colonized grains. They will suck up all of the water to inflate their cells, growing rapidly like erect penis’ out of the grains to spread their spores. During this part, you don’t need to worry about contamination quite as much. As long as your grains in the “Colonization” step are 100% colonized, there is no nutrients for bacteria or mold to hold onto, because all of the nutrients are covered and protected by the mycelium. So, in the first part (colonization), you needed to worry about avoiding contamination. In this second part (fruiting), you don’t need to worry about contamination as much, and instead focus on creating the perfect “fruiting conditions”.
That’s the basics of cultivation!
SUMMARY OF PART 1:
- Mushrooms (fungi) are more like bacteria than a plant.
- The majority of a fungus’s mass is underground as “mycelium”.
- Once the mycelium has fully colonized the available nutrients, it waits for fruiting conditions.
- Once fruiting conditions occur, it creates fruits (mushrooms) to drop its spores into the breeze.
- Cultivation is mostly focused on P. cubensis species.
- Spores are legal to buy and possess in 47 states (Except Georgia, California, and Idaho).
- You are replicating nature by colonizing sterile grains, then creating fruiting conditions indoors.
🍄 Part 2: Inoculating Uncle Bens for Colonization 🍄 -----------------------------------------------------------------------------------
[+]
The Basics/Why Uncle Bens?
Shroom cultivation has been around for a while, and there are many methods (known as “Teks”) for creating colonized “spawn grains”. Methods involve sterilizing grains in jars like PF Tek, or sterile plastic bags filled with pounds of grains. All of these methods can be learned, but most require utmost sterile technique, and use of a pressure cooker to sterilize. The pressure cooker step is needed because the grains you buy are not sterile, nor is the water you add. You need a pressure cooker to reach the proper pressure and temperature to kill any mold spores or microbes. Until Uncle Bens Tek started becoming popular.
I first read about it from /u/CrazyCatLushie’s “Full Instructions” post, which I quote now:
>“Humans can be incredibly lazy. So lazy, in fact, that we think it takes too much time to put rice in a pot of boiling water and wait for 20 minutes for it to absorb said water and become edible. Manufacturers have profited from our laziness (especially here in North America) by creating instant foods that come pre-prepared and ready to go. Enter pre-cooked rice in a bag. Uncle Ben’s is one example of a brand that offers this product. Some store brands offer it as well. Let me be clear: this is NOT what’s commonly sold in a box as “instant rice” or “minute rice”. This is rice that someone cooked completely and could put on a plate with some vegetables and protein and serve to a person. It is fully cooked, loaded into bags, sterilized so that it’s stable and safe to be stored at room temperature, then shipped to the store. You could eat it from the bag with a fork if you wanted to. It comes in multiple flavors but the one you want is just plain brown rice.”
This is the beauty of Uncle Bens. On the inside, these bags are miniature, pre-sterilized, perfect-humidity-water-weight nutrient-filled grains, just waiting for some spores to grow mycelium. You don’t need a pressure cooker. You don’t need ultimate sterile procedures. All you need is a bit of sterile-mindedness, a spore syringe, and some patience.
A note: Many growers, especially older growers, dislike Uncle Bens Tek because they believe you don’t learn sterile procedure with a pressure cooker and a still-air-box. And they’re right to some degree. This is an easy, beginner-friendly Tek, that you can learn the basics of mycology and growing your own mushrooms with. This is NOT an advanced Tek, and if you ever want to get into other parts of mycology (sterilization, cloning, agar, liquid culture, isolation, better yields) you will need to learn other Teks. With that being said, Uncle Bens Tek is a fantastic way to start, and I grew 3 dry ounces from $12 of Uncle Bens and knockoff brand rice bags.
Materials Needed:
- A 10cc multi spore syringe of P. cubensis.
- Recommended varieties include:
- Golden Teacher and B+. (These ‘varieties’ are not like weed 'strains', and aren’t all that much different. There’s a common phrase that “a cube is a cube”. Don’t worry too much about the variety you have.)
- Buy these spores from a trusted vendor online. (There’s nothing sketchy about it, unless you’re in one of the unlucky 3 states.)
- 10 bags of Uncle Bens Brown Rice or knockoff brands (Safeway knockoffs kick ass) per syringe.
- (You ONLY want pure brown rice. This flavor has 30mg of sodium, whereas all of the other flavors have 5-10x the sodium. Don’t get Uncle Bens Basmati or Uncle Bens Quinoa with Garlic. You don’t want flavors, you just want the pure Uncle Bens brown rice.)
- You will want multiple bags. Expect to have a few losses to contamination, especially for your first time.
- 70% Isopropyl Rubbing Alcohol.
- DO NOT GET 90% or higher. The 70% is perfect. It actually does a better job of penetrating the cell walls of bacteria, and doesn’t evaporate too quickly. Stock up on some of this stuff, because you can never have enough.
- Gloves (Nitrile ones are my favorite)
- Paper towels (to wipe things with the alcohol)
- Lysol or another air disinfectant
- Face Masks
- Micropore Tape (SEE /u/lit-logistics POST ON PROPER TAPE SELECTION HERE!)
- Micropore tape is essential. Don’t skip out, get the right stuff. Proper micropore tape only allows Oxygen and CO2 to pass through, but not much water and definitely doesn’t allow contams through. You need this item.
- A Still Air Box (SAB) (Optional but highly recommended)
- Scissors
- Lighter
Explanation: We want to be as sterile as possible, but we don’t need to worry about sterilizing the inside of our bags because they are already sterile inside (the beauty of Uncle Bens Tek). To start, you’ll want to close any windows, turn off any fans, heaters, or AC that move your air, and find a relatively small and clean room to begin. Bathrooms aren’t always the best, because many mold and mildew spores already thrive in your bathroom air. Let the air stop moving entirely in your house/apartment. Moving air circulates contaminants.
Take a shower and really scrub your hands, arms, and under your nails. Put on your cleanest clothes, and wear a hat or a hairnet. You’ll want to spray the shit out of your now-still air in your selected room with Lysol, and wipe everything down with 70% ISO. You can’t really overdo the sterility here. Make sure your Lysol settles, though.
I didn’t need a SAB (Still air box) for my first few generations of Uncle Bens Tek, and I never lost a single bag to contamination. I also live somewhere extremely dry, so the air already has little contaminants in it. Regardless, using a SAB will improve your contamination rate, but isn’t necessary to begin.
The name of the game is inoculation. You need to get your spores into your Uncle Bens Bags while introducing as few contaminants as possible. You also need to provide some kind of “Gas Exchange” in the form of a small micropore tape vent. This “Gas exchange” (GE) vent is still being debated, but it’s generally accepted that it’s helpful to keep your bags alive as they colonize. There are a few different methods that are currently being tested and developed, but they follow the general instructions:
The “Corner Cutting” Method (older but confirmed):
[+]
- Wear hat, mask, and gloves. Wipe your surfaces with ISO and Lysol the air. Let the Lysol settle. Wipe your gloves down with ISO to begin, and repeatedly throughout the process. If you're using a SAB, do everything inside the SAB except flame sterilization.
- Wipe your syringe’s body down with ISO. Screw on the needle, and wipe with ISO. I like to set my syringe down on a paper towel soaked with ISO until I need it.
- Wipe your Uncle Bens bag up and down with ISO. Make sure you get every part of it covered, and especially the front where you will inoculate. Let it dry.
- Break up the rice through the bag with your hands. You want the rice to no longer be stuck in a “cake”, but free-moving and soft. Break that shit up!
- Wipe down your scissors with ISO and let them dry. Cut a diagonal 1” slice off a top corner of the bag. Keep the bag closed to avoid contaminants from the air entering until you tape it up.
- Flick, shake, and spin your closed spore syringe. The black spores are likely clumped up, and you want to shake it each time you inoculate to spread the spores into the solution.
- Wipe down your syringe and needle and let it dry. Take your lighter and flame sterilize the needle until it’s glowing red hot. If you’re using a SAB, flame sterilize outside of your box so you don’t light any ISO inside on fire. Once it’s glowing red-hot, bring it into your SAB to cool.
- Stick your sterilized syringe into the cut corner of the bag, only as far as the needle reaches inside, and squirt 0.5cc (half of one mL) of the shaken spore solution. If you insert more than 0.5 to 0.75cccc, you will be adding too much liquid and will throw off the perfect amount of moisture, making it too wet. UPDATE: Many users find that brand-name Uncle Bens bags are already too wet, **so for brand-name or already-moist bags, I definitely recommend no more than 0.5cc per bag.**You do NOT need many spores to enter your bag; all it takes is a few. By adding more liquid you throw off the amount of moisture. I find that knockoff brand bags, like Aldi or Safeway, have less water and therefore have better results. Seriously, DO NOT BUY/USE brand name Bens Original unless you have to. PLEASE err on the side of caution, and if the bags look moist through the viewing window on the bottom, add LESS solution than you think you need. You won't lose them to "wet rot" or contamination, and you'll be much happier.
- Remove your syringe and set it aside. It will need to be wiped down and flame sterilized again for the next bag.
- Take your micropore tape, and tape over the open corner in a way that holds the corner-hole open to create a gas exchange vent. You don’t want to fully seal it closed with tape.
- Here’s an example of some good-looking bags. [+]
- Here’s an example of a corner that was cut too much, but is still useable. [+] If you have to use two pieces of micropore tape, tape it vertically to try to only use one piece.
- Check out the Chip Clip Method from /u/ThisIsMyShroomAcct. Could be the best method yet!
- Set aside your finished bag.
- Wipe down your gloves, wipe down your next bag, then shake your syringe again, wipe it down, dry it out, flame sterilize it, and inoculate your next 9 bags.
- You’re done!
Newer methods: Steps 1-3 and 5-6 all stay the same. But, some clever Redditors came up with a few great ideas to prevent contamination:
-
The most obvious one that I started using: The Chip Clip method. The point of this method is to clip the bag shut while cutting and taping your corner. This prevents any outside air from entering your open corner before the micropore tape is in place. You can also combine this method with the next method for ultimate anti-contamination efforts:
-
The Capri-Sun Method will likely be the next big thing, if it works well.
- Yes, like the juice pouch, you simply stab your heated needle into the center of the bag (after sterilizing the bag and needle of course) and inject your 0.5-0.75cc spore solution. Tape over it with a micropore tape, and you’re almost done. You still need to add a Gas Exchange hole in the form of a corner cut or a hole punch.
- The Capri Sun method might need more gas exchange holes as mentioned above, which is why redditors created the Hole-Punch Method. By using a hole punch to add your air holes, you open even less of the bag up to contam chances.
There may be a perfect method which combines all 3:
- Follow sterile procedures as listed in the Corner Cutting Method.
- Swing the bag from the top to force all of the rice away from the top (or squeeze the rice down) towards the bottom.
- Use the Chip clip method to hold your top of your bag separate.
- Use the Hole Punch method to add 2-6 air holes across the ‘clipped’ top.
- Use the Capri-Sun method to inoculate your bag by sticking a hot-tipped needle into the middle of your bag and inserting 0.5cc of solution, then covering that hole with micropore tape.
- Remove your chip clip, and you’re ready to go!
“Ok, so I inoculated my bags. What do I do now?”
Explanation: That was the inoculation step. Now, you need the colonization to happen. Most importantly, you want fast and health mycelium growth, so it can outcompete any potential contams inside the bag.
- Mycelium colonizes faster with steady temperatures. Fluctuations in temperature will slow down growth and give contams a chance to beat the mycelium. Find a warm, dark place in your home to put your bags, that is free from extra humidity and mold (under a kitchen sink or in a bathroom are both terrible ideas). A closet or shelf work great. It’s best if it’s a steady temperature.
- You will get the fastest colonization rates at 75-80 degrees Fahrenheit. Below 75, and it can take weeks to months allowing contaminants to beat the mycelium. Above 79/80 degrees, and it may be too hot and will contaminate as mycelium can’t grow in that heat, but bacteria can. You can also dry out your bags with extra heat, especially if you have massive gas exchange micropore holes.
- Many people find that their room temps in a closet work just fine. Don’t worry about it too much. But, if you want the best growth, you should consider finding a way to incubate your bags:
- Some people use heat mats, but many find them to be overkill or poorly distribute the heat. I would not recommend.
- I personally use a closet with a $15 heater and a temperature controller set to 79F max and 75F min. I find that my bags fully colonize in 1-2 weeks, but sometimes faster.
- Some people use aquarium water heaters and make a kind of “water bath”, often using two tubs. I tried this but would recommend a heater and controller over this setup.
- Once your bag is 20-30% colonized, you should break up the mycelium chunk and shake vigorously to redistribute your mycelium. Thanks to /u/question_tek420*.*
- You will be able to tell it’s partially colonized because of the viewing window on the bottom, or by feel. The rice will become hardened and compacted where the mycelium has colonized.
- Leave your bags alone until around day 5-7. If you feel hard colonization about 20% worth, break it and shake it!
- After shaking, give it a day to recover from the shaking. It may experience bruising, where psychedelic mycelium and mushrooms turn dark electric blue from physical touch. Here is a great example of a bag that is NOT CONTAMINATED, only bruised. Once it recovers, it will explode in growth and will likely 100% colonize within days.
- Once your bags are colonized, it’s time to move on to Part 3: Fruiting! If you made it this far without any contamination in your bags, get hyped!
SUMMARY OF PART 2: INOCULATION/COLONIZATION:
- Sanitize everything. The more sterile you are, the better your results will be.
- Buy spore syringe and uncle bens bags. Inject 0.75cc of solution into the bag, after sterilizing needle.
- Bags most likely need a micropore vent for gas exchange. Try cutting the corner, or hole punch, for gas exchange. If you do the Capri Sun method for injecting, make sure to cut a vent or use a hole punch to add a GE vent.
- Keep inoculated bags somewhere decently stable and warm, away from bathrooms or kitchen sinks.
- Using a heater to maintain temperatures can increase colonization speed.
- Once bags are 20-30% colonized, break up the mycelium and shake vigorously. Bruising may occur, but it will recover and growth will explode.
- You need 100% colonization before proceeding to Fruiting.
🍄 Part 3: How to Spawn to Bulk (Fruiting) 🍄 ----------------------------------------------------------------------------------- [+]
Historically, shroom cultivators had generally two options for fruiting their mushrooms:
- Shroom “cakes” from a jar, placed in a fruiting chamber
- “Spawning to bulk” in a plastic tub, with a substrate.
The concept with both Teks are the same: Introduce water, humidity, evaporation, and FAE (Fresh Air Exchange). You are simulating the fruiting phase that occurs in nature. Fresh Air Exchange is like Gas Exchange from Part 2 on steroids: you will need WAY more of it when the time comes.
How Cakes in fruiting chambers work: We won’t be using this method, because it doesn’t work super well with the irregular shaped “cakes” from Uncle Bens bags. Also, cakes don’t produce the same size harvests as Spawning to Bulk. The 100% colonized cakes are removed from their jars soaked underwater to hydrate them overnight. Then, they’re placed on foil to separate them from Perlite, a waterlogged high-surface-area material that allows for high humidity and evaporation, and given immediate FAE (Fresh Air Exchange). This triggers mushrooms to grow. The mushrooms can be harvested, the cakes re-hydrated, and placed back into the chamber for a second flush. Once again, we will not be using this method for Uncle Bens spawn grains (though you can experiment with it!).
Spawning Uncle Bens Spawn Grains TO BULK: Spawning to bulk in a Monotub is easy and will get you bigger yields for your spawn grains.
Explanation: There are three parts for spawning to bulk you need to know.
- The tub. modified, unmodified, or dub-tub?
- The substrate. CVG, CV, or just Coir? What ratio of spawn: substrate?
- The conditions. Let it fully colonize, or put to fruiting right away? Moisture?
-
The tub. You will need at least a 4-quart (1 gallon) plastic tub. My preferred tub is in the Materials section below. Many people use 6 quart Shoebox tubs for Shoebox Tek. We are basically doing just that. It will need some way to introduce airflow. Many people cut holes and stuff with polyfill, or cover with micropore tape. I prefer to not do either; I simply crack my lid with BOD’s Unmodified Monotub Tek. I find that cracking my lid 1-2cm, and adjusting to create perfect conditions, has been a great method. As a bonus, if you don’t modify (drill) your monotub, you can use BOD’s Floating Harvest Tek to harvest. This is what I do with my monotubs. You can’t do this if you drill your tub. If your mushrooms begin growing too tall, you can toss a bag over it or do a dub-tub method.
-
The Substrate. Your options are 100% Coco coir, or a Coco coir & Vermiculite mix, or the CVG mix (Coco, Verm, and Gypsum). You’ll need to take some water, a 5 gallon bucket, and rehydrate your substrate with boiling water to pasteurize it. Some people believe adding extra new nutrients to the bulk substrate will help increase yields, such as manure or coffee grounds. They’re probably right, but I also believe it will lead to contamination. Your colonized spawn grains already contain all of the nutrients required to fruit mushrooms, but the grains are 100% colonized by mycelium and won’t be contaminated. If you add extra coffee grounds, manure, or potting soil to your substrate, I believe you are asking for contaminants. I only use 100% Coco coir, and it’s been great. I haven’t had a single tub contaminate yet. You’ll hydrate your substrate, then make sure it’s at “field capacity”, where it is barely holding water, but is still hydrated.
- A great trick to reach near-perfect "field capacity" is: for every 1g of dry/compressed coco coir, add 5.1g of boiling water and mix extremely well, then let sit. This will get you close to perfect field capacity every time.
- When in doubt, add more boiling water than necessary. This is because once cooled, you can always squeeze the extra water out of each handful of coco coir when adding it to your tub.
- Many growers use Liners [+], cut black plastic bags, to prevent a microclimate developing on the sides and bottom of the tub. The idea is that the liner shrinks with the substrate as it changes over time, preventing any fresh air or proper conditions from forming on the sides and bottom, where you don’t want mushrooms to grow. Side and bottom pins aren’t the end of the world, but they are a pain to harvest comparatively. I do not use liners. Though I get a few side pins every now and then, I can prevent side pins by focusing on perfect surface conditions (more in the next section “The conditions”).
- You’ll break up your ‘cakes’ from your Uncle Bens bags into the tub, add your field capacity substrate, mix thoroughly, then move onto the conditions. It’s that simple.
- A great trick to reach near-perfect "field capacity" is: for every 1g of dry/compressed coco coir, add 5.1g of boiling water and mix extremely well, then let sit. This will get you close to perfect field capacity every time.
-
The conditions: There is some debate as to whether or not you should let your mycelium colonize your substrate first or put the tub straight to fruiting conditions (light, FAE, misting, evaporation). Personally, though I had success going straight to fruiting, I often dried out my tubs before they produced pins (baby mushrooms) because my air is so dry here.
- Drop your temps down from colonization temps (75-79F), to fruiting temps: 72-76F.
- Instead, I went with the first method: I let my bulk substrate colonize, 50-75%, until I saw “primordia”, “knots”, and a few “pins”, then introduced fruiting conditions. This method has worked much better for me.
- During this time, you want to focus on “Surface conditions” of your substrate. Read this Tek on surface conditions, for the love of god. If you can maintain thousands of tiny droplets, and some humidity on the sides/top of your tub, you’re in great shape.
- Once your surface conditions are proper, you should see pins develop across the top. These pins start out growing slowly, but will suddenly become full-grown shrooms. Here’s a great timelapse example from /u/tornadic_Vortex.
- Finally, you will want to harvest your tub, rehydrate your substrate (as mushrooms are 90%+ water weight), and prepare for a Second Flush (More on that in Part 4: Harvesting).
Materials Needed:
- Monotubs: At least 2-4 tubs. Size should be 4-6 quarts for 1-2 bags of spawn, depending on tub height.
- I use the IKEA Samla 1-gallon tubs with lids, and they are perfect. They’re much more tall than then are horizontal, which is what you want. The lids are clear plastic too.
- Substrate: I use 100% Coco coir bricks.
- Here’s the bricks I use. $5/brick, and 1 brick is enough for like 6 tubs at least.
- Optional: If you want to add vermiculite, it’s a good idea. It helps maintain moisture levels even better than coco coir, but I have had great success with 100% coco coir.
- Bucket to pasteurize/hydrate your substrate.
- I use a home depot 5 gal bucket with lid. An insulated cooler-style bucket might work better, but this is really fine.
- Mister.
- Here’s the mister I use. [+]
- I do not recommend “sprayers”, because the force of the water is often too strong and will bruise your mycelium.
- Light source and timer (optional).
- Here’s the timer I use. I use 6000K color temp light bulbs or LED’s. [+]
- I ended up soldering my own LED strips into fixtures for my closet. Here’s my closet.
- You can use ambient light from a window, or a room. Mushrooms don’t need light to grow. Light only tells the mushrooms which direction to grow towards.
----------------------------------------------------------------------------------------------------------------------
My Method for creating the perfect Uncle Bens Monotub:
Part A: Shroomscout’s Easy AF bucket Tek.
I basically follow Bod’s Bucket tek, except I don’t bother measuring my water amounts, and I use a home depot bucket.
- Place an entire brick of coco coir into the bucket.
- Boil ¾ gallon of water. You may need more later.
- If you have nasty tap water, I’d recommend using distilled gallons for this step.
- Add the boiling water, stirring with a knife, to the bucket. Break up the brick as much as possible.
- You want to keep adding boiling water until the substrate is generally hydrated and broken up.
- You DO NOT want standing water, or for it to be soaking wet on the bottom. It’s not the end of the world if it is, though. I don’t measure my water amounts TBH.
- Put the lid on, and let it sit HOT for hours until cooler to the touch. Waiting overnight works really well.
Part B: Adding your Spawn
- In your clean monotub, add 1” deep coco coir at field capacity. You will add more later.
- I squeeze my coco to field capacity over my bucket, then add each handful at a time.
- With clean scissors, cut open your spawn grain bag. Check for contamination.
- Inside should be clean, healthy, white mycelium 100% colonized.
- If there are a few grains uncolonized, that’s ok. Make sure to brush off these grains and dispose of them properly.
- Blue bruising is totally fine, but green, solid yellow, red, and purple are signs of contamination.
- If it’s contam’d, throw that shit out and sanitize everything again.
- Using gloved hands, start breaking apart your “cake” into the coco coir.
- Some people use cheese graters, but I find using my hands works fine.
- Break it apart as finely as you can. Individual clumps of grains are perfect, but do not leave large clumps.
- In this post[+], you can see my broken-up grains sitting on top of my 1” of coco. The following pictures [+] show what it looks like after mixing, then casing with coco.
- Mix thoroughly.
- This is very important for even flushes. MIX THAT SHIT UP.
- After mixing, check your substrate depth.
- You want 2-4” deep, depending on tub height.
- Add more coco coir (at field capacity hydration) as needed to reach 2-4 inches, and mix thoroughly repeatedly.
- Once you have a solid 2-4” deep spawn:substrate combination, level it out.
- Using your fingers, smooth the surface out. Make it level. Pack it down a bit if you need to.
- You want your surface as uniform as possible.
- Add your casing layer. At field capacity, sprinkle enough coco coir to cover all visible white grains completely, 1/8” to ¼” deep.
- Like Step 7, you want this “casing” layer to be as smooth as possible.
- This casing layer is critical to help maintain moisture and create the perfect microclimate for pins to develop.
- Done! Now, you’re on to creating the perfect climate for your monotub.
Part C: Caring for your tubs
- Let your tubs colonize the surface 75% before introducing fruiting conditions. Temps should be 72-76*F.
- Let your tubs colonize first, like this. You can see my casing layer is having mycelium colonize through. This is good.
- To get them to colonize like this, let them sit undisturbed for a few days with the lid on. I don't even lift the lid to exchange airflow. Just leave them to colonize like they did in the rice bags. This step will colonize much faster than spawn grain colonization, though.
- Once they’ve colonized the majority of the surface to 75% coverage, or you see knots or pins, flip/crack the lid.
- In my link above [+], you can see my first pins coming out of the surface. At this point, I cracked the lid.
- This step is to provide FAE (fresh air exchange).
- Give them some light. A lamp or bulb, 6500k, on a timer for 12h on/off works perfectly. Window light and ambient room light is ok too.
- If your tub doesn’t have a clear lid, you can cut the center of the lid and tape saran wrap over it. I recommend IKEA Samla 1 gallon tubs, or something similar, because they have clear plastic lids.
- After introducing FAE, you will likely need to mist more frequently to maintain surface conditions as water is removed through evaporation.
- See this post for proper surface conditions. [+]
- You do NOT want water pooling on your surface. If you mist too much, it will pool and suffocate the mycelium underneath. In this scenario, crack/fan your tub more frequently, and it will dry that pooling up.
- Once you get your pinset, try not to mist directly on the pins. A little water is ok.
- Here’s a video of my pins the day before they were ready to harvest. [+]
- Keep an eye on your tubs now. You will only have a 12-24 hour window to pick the mushrooms at the perfect time, covered in Part 4: Harvesting.
Congrats! You will soon get mushrooms. Here’s my pinset. And here’s the same tub 24 hours later. THEY WILL GROW EXTREMELY FAST at this point, so be attentive! [+]
SUMMARY OF PART 3, SPAWNING TO BULK:
- Your bags need to be 100% colonized
- I like using unmodified monotubs, 4-6 quarts in size. IKEA Samla 1 gal tubs are perfect.
- I only use 100% coco coir as my substrate, pasteurized with the Bucket Tek.
- I add 1-2 bags of Bens per 4 quart tub, and mix in coco coir until 2-4” deep.
- Add a casing layer to make the perfect microclimate for pins.
- Let the tubs colonize until knots/pins show up.
- Then, induce fruiting conditions with light, FAE, and misting.
-----------------------------------------------------------------------------------
🍄 Part 4: How to Harvest, Dehydrate, and Prepare for the Next Flush. -----------------------------------------------------------------------------------
[+]
Note: if your mushrooms have “fuzzy feet”, or grow “long and skinny”, it means they didn’t have enough FAE. You really do need to provide constant airflow, without drying anything out, to get healthy, full-sized shrooms.
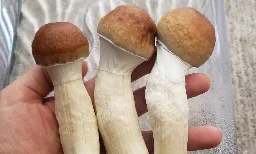
Once you get your full-grown mushrooms, it’s time to harvest. There are two methods:
- A) Twisting and Pulling, where you rip the mushroom from the mycelium.
- I tried this method on my first ever tub, but I was wrong. No further flushes grew from/around the areas I ‘twisted and pulled’ from, and it ruined half of my tub.
- B) Slicing and leaving stumps.
- IMO, this is the far superior method.
- The stumps will quickly oxidize, turning slightly (or majorly) blue. They make a good microclimate for future pins.
- Here’s a picture of the stumps left behind. This user should have cut the stumps much closer to the substrate. You want to leave as little stump behind as possible. [+]
**If you didn’t modify your tub with holes, you can use BOD’s Floating Harvest Tek to harvest your flushes. [+] **
- Using clean tap water, or distilled/filtered water (I use my RO water system), trickle in some water down the side/corner of your tub.
- As the water fills your tub, it should begin floating the entire ‘cake’ of substrate+mycelium to the top.
- Take a precise pair of scissors (I use curved fly tying scissors), cut your stumps as close to the substrate as possible.
- Work from one corner in, then flip the tub around.
- Don’t leave any pieces of mushrooms, or sliced pins, on the substrate. They will rot if they’re not connected to the mycelium network.
- Rinse, wipe, or cut off any coco coir attached to your mushrooms. I see a lot of users that leave their substrate on their stems (even something that’s bad for your stomach like vermiculite!). Clean your fruits off people!
"When do you harvest?" BEFORE the veil breaks, if possible.
See this site for great examples of perfectly picked mushrooms: https://www.magic-mushrooms-shop.com/blog/when-harvest-magic-mushrooms
Once the veil breaks, three (speculated) things happen:
- The mushroom no longer produces psilocybin anymore. It puts all of its energy into dropping its spores. Potency may even decline. This is speculated, and not scientifically confirmed (as far as I know).
- The mushroom drops it’s spores. The spores are dark black and will fall onto other shrooms, the walls, and the surface below. They can suffocate healthy mycelium. DO NOT LET your mushrooms get this far. If they do, they’re safe for consumption, but the dropped spores can ruin your monotub.
- Finally, the mushrooms and their caps begin to rot.
So, harvest before the veil breaks and spores drop!
Now you’ve harvested your tubs. "What now?"
Mushrooms are 85-95% water weight. Fresh fruits, when removed from their mycelium, will begin rotting within 12-24 hours. You need to dehydrate your harvests.
Here’s a video on a couple of methods. [+] You can use a fan and a window screen, Epsom salts, silica packets, or an oven (not recommended).
But, the holy grail of dehydrating is… a dehydrator!
If you plan on growing even a decent amount of shrooms, you should invest in a dehydrator. Here’s the dehydrator I use, for $34. [+] I also cut some cheap fiberglass windowscreen to fit in the trays, because really small fruits and pins I harvest would fall through the trays. It works perfectly.
PLEASE READ: ANY temperature between 100F to 200F is completely acceptable without any noticeable loss in potency.
-----------------------------------------------------------------------------------
https://www.oregon.gov/oha/PH/PREVENTIONWELLNESS/Documents/Stability%20of%20Psilocybin%20and%20Analogs.pdf
In the section from the study above, you can clearly see that there is relatively minimal potency loss when drying mushrooms from 25-75C (77F to 167F).
Also, you can see on Pubchem from the National Institute of Health that Psilocybin doesn't reach its melting point until 220C (428F).
Psilocybin doesn’t lose potency until hotter temperatures. This is why an oven is not recommended. A Fan+screen, silica packets, and a dehydrator are all excellent ways to dehydrate at lower temperatures. I usually run my dehydrator at 130*F overnight to dehydrate a harvest.
You want your dehydrated shrooms to be cracker-dry. They should snap with little effort.
If you cannot dehydrate immediately, throw them in a container in the fridge. They will last fresh for 1-3 days, but will rot quickly. DEHYDRATE THEM, DAMNIT!
"How do I store my dried shrooms?"
In an airtight container, such as a rubber-gasket airtight glass jar. If you throw in a silica packet or two, taped to the lid, your shrooms will stay potent for YEARS. You can also vacuum seal fruits.
Store them away from light in a cool, dark, dry place. Some people go the extra mile, with an airtight container, silica packets, and stored in the fridge/freezer. I think that’s overkill, a jar and a silica packet will make them last for a very long time.
I also put mine into capsules for microdosing and precise/easy trip doses. See my video on how I make my microdosing capsules here.
"What do I do with my tub now? How do I prepare for another flush?"
Like I said, mushrooms are ~90% water weight. They just sucked all of their water from their network up into their pins’ cells to make big mushrooms. You need to simulate another rain, to rehydrate them!
If you used the floating harvest tek method to harvest, the bottom/majority of the tub as already been soaking. Some people like to weigh their monotub ‘cakes’ down underwater, with a rule of 1 hour for every 1 inch deep substrate. It’s not a bad idea, but I can’t find a good way to hold my cakes underwater for that long. Instead, I usually soak my monotub cakes by floating them for a few hours, while misting the shit out of the top until water pools. After 2-3 hours, I lightly hold the cake to the bottom of the tub and pour out the remaining water into the disposal drain. This has given me some awesome second flushes. Don't skip this step, your cakes will be WAY too dry if you don't rehydrate them.
Second flushes are often smaller in number/frequency of shrooms, but grow larger shrooms. 3rd and 4th flushes often only produce 1-5 MASSIVE fruits for me. It depends on your genetics and conditions.
Once you’ve rehydrated your substrate, flip the lid and crack it, and prepare to see pins again soon!
Since coco coir doesn’t have many nutrients, there is nothing for contamination to get ahold of. I’ve had a few tubs already go to their 6th flush, producing fruits for 4 weeks straight now. Using clean, filtered RO water might have something to do with that, but I’m not sure. Most tap water is fine.
SUMMARY OF PART 4:
- Harvest by cutting as close to the substrate as possible. The stumps will not rot, and will leave a nice microclimate for the next pins. DO NOT twist and pull.
- Harvest before the veil breaks, or spores will make a mess in your monotub.
- If your tub is unmodified, you can float the cake to the top with water. This also doubles as a method to rehydrate your substrate, and is how I harvest my tubs.
- Soak/rain/mist your monotubs to rehydrate them completely. I wouldn’t leave any extra standing water, but it should be WET in there so they can rehydrate after expending all of their water.
- You NEED to dry (and try) out your harvests ASAP. A dehydrator, set to 140F or lower overnight, is the perfect method, but there are cheaper options.
- Store in an airtight container, with a silica gel packet taped to the top if possible.
- You can make airtight microdose capsules.
- Dried harvests should last years with minimal potency loss.
---------------------------------------------
🍄 TL;DR: ENTIRE Summary of Shroomscout’s Official “Easiest Way to Learn Shroom Growing with Uncle Bens Tek”:
- Mushrooms need to fully colonize nutritious grains, then experience fruiting conditions.
- We use Uncle Bens as a premade sterile grain source.
- Inoculate your bags with a Multispore Syringe.
- Let it colonize (and shake at 30%!).
- Once fully colonized, spawn to bulk in a monotub.
- Use 100% coco coir as the substrate, hydrated to field capacity, with boiling water.
- Make it 2-4” deep, with a 1/8”+ casing layer of coco coir.
- Let it colonize the substrate a bit, then induce fruiting conditions by cracking/flipping your lid.
- Mist frequently enough to maintain proper moisture and humidity. Don't over-mist.
- Harvest the mushrooms before the veil breaks, but cutting and leaving as little stump as possible.
- Dehydrate them and store them in an airtight container.
- Rehydrate your substrate and put back into fruiting conditions for the next flush.
Thanks for reading. Feel free to ask questions!
You can see my results HERE. (https://www.reddit.com/user/shroomscout/submitted/)
- First pins!
This is after about a week of them being in fruiting conditions, they're sprouting up really fast now.