LemmyNet
- Lemmy version 0.18.2 has been released
This version patches the security vulnerability related to custom emoji’s.
- Sync for Reddit dev will be developing a Lemmy versionlemmy.world Looks like this might be a thing now! - Lemmy.World
https://www.reddit.com/r/redditsync/comments/14e7ikp/lets_talk_about_lemmy/ [https://www.reddit.com/r/redditsync/comments/14e7ikp/lets_talk_about_lemmy/] https://www.reddit.com/r/SyncforLemmy/ [https://www.reddit.com/r/SyncforLemmy/] Glad ljdawson is going to try to make this a thing! >ljdawson > >M...
Pretty cool announcement. Hope those weeks of waiting are worth it. Lemmy could be greatly improved with more mature apps in its ecosystem.
- Lemmy versus IPv6: over half the Lemmy servers can't reach IPv6!
cross-posted from: https://lemmy.ml/post/1390029
> cross-posted from: https://popplesburger.hilciferous.nl/post/9969 > > > After setting up my own Lemmy server, I've been intrigued by the server logs. I was surprised to see some search engines already start to crawl my instances despite it having very little content. > > > > I've noticed that most requests seem to come in from IPv4 addresses, despite my server having both an IPv4 and an IPv6 address. This made me wonder. > > > > IPv4 addresses are getting more scarce by the day and large parts of the world have to share an IPv4 address to get access to older websites. This often leads to unintended fallout, such as thousands of people getting blocked by an IP ban from a site admin that doesn't know any better, as well as anti-DDoS providers throwing up annoying CAPTCHA pages because of bad traffic coming from the shared IP address. Furthermore, hosting a Lemmy server of your own is impossible behind a shared IP address, so IPv6 is the only option. > > > > IPv6 is the clear way forward. However, many people haven't configured IPv6 for their hosts. People running their own Lemmy instances behind an IPv6 address won't be able to federate with those servers, and that's a real shame. > > > > # Looking into it > > > > So, I whipped up this quick Python script: > > > >
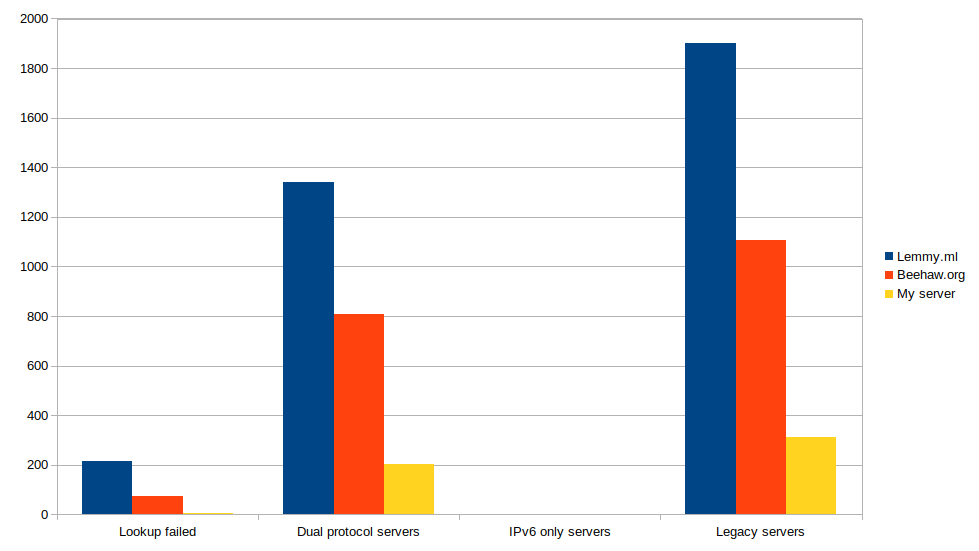
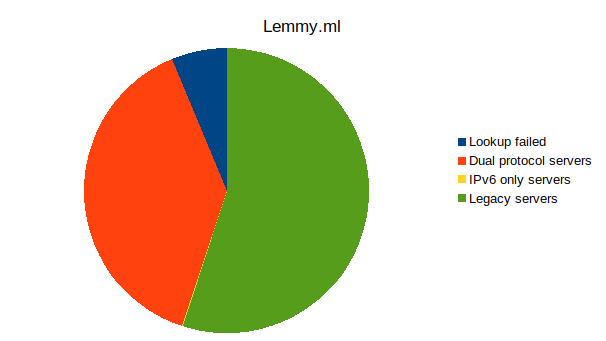
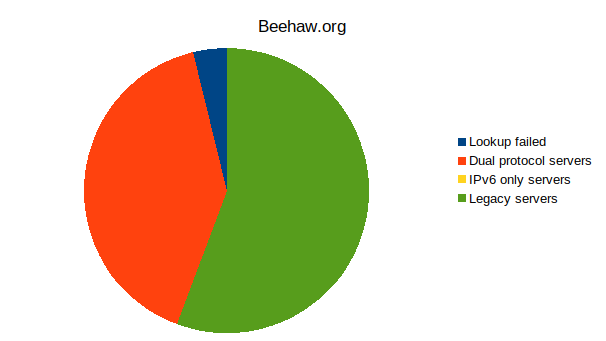
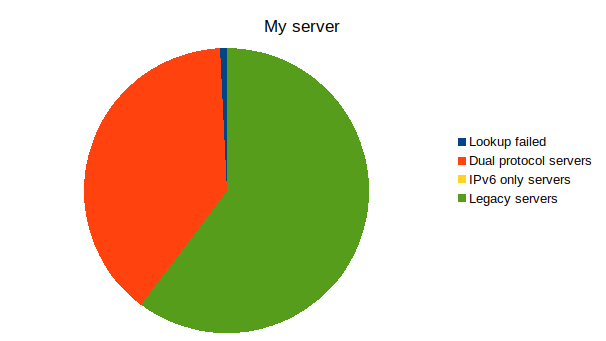
python3 > > import requests > > import sys > > import socket > > from progress.bar import Bar > > > > lemmy_host = sys.argv[1] > > > > site_request = requests.get(f"https://{lemmy_host}/api/v3/site").json() > > > > hosts = site_request['federated_instances']['linked'] > > > > ipv4_only = [] > > ipv6_only = [] > > both = [] > > error = [] > > > > with Bar('Looking up hosts', max=len(hosts)) as bar: > > for host in hosts: > > host = host.strip() > > > > try: > > dns = socket.getaddrinfo(host, 443) > > except socket.gaierror: > > error.append(host) > > > > has_ipv4 = False > > has_ipv6 = False > > for entry in dns: > > (family, _, _, _, _) = entry > > > > if family == socket.AddressFamily.AF_INET: > > has_ipv4 = True > > elif family == socket.AddressFamily.AF_INET6: > > has_ipv6 = True > > > > if has_ipv4 and has_ipv6: > > both.append(host) > > elif has_ipv4: > > ipv4_only.append(host) > > elif has_ipv6: > > ipv6_only.append(host) > > else: > > error.append(host) > > > > bar.message = f"Looking up hosts (B:{len(both)} 4:{len(ipv4_only)} 6:{len(ipv6_only)} E:{len(error)})" > > bar.next() > > > > print(f"Found {len(both)} hosts with both protocols, {len(ipv6_only)} hosts with IPv6 only, and {len(ipv4_only)} outdated hosts, failed to look up {len(error)} hosts") > >> > > > This script fetches the instances a particular Lemmy server federates with (ignoring the blocked hosts) and then looks all of them up through DNS. It shows you the IPv4/IPv6 capabilities of the servers federating with your server. > > > > I've run the script against a few popular servers and the results are in: > > > > # Results > > |Server |IPv6 + IPv4|IPv6 only|IPv4|Error|Total| > > |----------|-----------|---------|----|-----|-----| > > |Lemmy.ml |1340 |3 |1903| 215| 3461| > > |Beehaw.org|807 |0 |1105| 74| 1986| > > |My server |202 |0 | 312| 4| 518| > > > > !A bar chart of the table above > > > > !A pie chart of the results for Lemmy.nl > > > > !A pie chart for the results for Beehaw.org > > > > !A pie chart for the results for my server > > > > It seems that over half (55%+) the servers on the Fediverse aren't reachable over IPv6! > > > > # I'm running my own server, what can I do? > > > > Chances are you've already got an IPv6 address on your server. All you need to do is find out what it is (ip address showin Linux), add an AAAA record in your DNS entries, and enable IPv6 in your web server of choice (i.e. listen [::]:443 in Nginx). Those running a firewall may need to allow traffic through IPv6 as well, but many modern firewalls treat whitelist entries the same these days. > > > > Some of you may be running servers on networks that haven't bothered implementing IPv6 yet. There are still ways to get IPv6 working! > > > > ## Getting IPv6 through Tunnelbroker > > If you've got a publicly reachable IPv4 address that can be pinged from outside, you can use Hurricane Electric's Tunnelbroker to get an IPv6 range, free of charge! You get up to five tunnels per account (each tunnel with a full /64 network) and a routed /48 network for larger installations, giving you up to 65k subnets to play with! > > > > There are lots of guides out there, some for PfSense, some for Linux, some for Windows; there's probably one for your OS of choice. > > > > ## Getting IPv6 behind CGNAT > > > > Getting an IPv6 network through a tunnelbroker service behind CGNAT is (almost) impossible. Many ISPs that employ CGNAT already provide their customers with IPv6 networks, but some of them are particularly cheap, especially consumer ISPs. > > > > It's still possible to get IPv6 into your network through a VPN, but for serving content you'll need a server with IPv6 access. You can get a free cloud server from various cloud providers to get started. An easy way forward may be to host your server in the cloud, but if you've got a powerful server at home, you can just use the free server for its networking capabilities. > > > > Free servers are available from all kinds of providers, such as Amazon(free for a year), Azure(free for a year), Oracle(free without time limit). Alternatively, a dedicated VPS with IPv6 capabilities can be as cheap as $4-5 per month if you shop around. > > > > You can install a VPN server on your cloud instance, like Wireguard, and that will allow you to use the cloud IPv6 address at home. Configure the VPN to assign an IPv6 address and to forward traffic, and you've got yourself an IPv6 capable server already! > > > > There are guides online about how to set up such a system. This gist will give you the short version. > > > > # Final notes > > It should be noted that this is a simple analysis based on server counts alone. Most people flock to only a few servers, so most Lemmy users should be able to access IPv6 servers. However, in terms of self hosting, these things can matter! - ❗️Admins: REQUIRE E-MAIL VERIFICATION OR A CAPTCHA FOR REGISTRATION
cross-posted from: https://lemmy.cat/post/6385
> It is currently possible, through Lemmy's API, to create accounts automatically and without limit if verification by email address or captcha is not activated. I'd advise you to activate one or both of them NOW! > > After registering x number of accounts (currently I could do thousands), all you have to do is list all the existing communities for each of the account to publishes one new post per community, or more. I'll leave you to picture the mess. > > (I apologise to the administrators of sh.itjust.works, I should have done the test with my own server.)
- Running Lemmy with Docker on a Raspberry Pi
Last time we discussed how to set up Lemmy locally, this time we will discuss setting up Lemmy in production mode on a Rasberry Pi with functioning image upload by using Docker. This time we have to deviate more from the official guide as some things don’t seem to work. To follow this guide, you will need a basic understanding of the terminal and a Raspberry Pi 3 or 4 (I have only tested this on the Raspberry Pi 4). If you are on Windows 10 or 11 you can use OpenSSH in PowerShell.
Setting up the Raspberry Pi
To prepare an SD card for the Raspberry Pi, download the Raspberry Pi Imager. Insert the SD card, select the Raspberry Pi OS Lite (64-bit) and make sure you pick the SD card for Storage. You could pick the full version of the OS, but make sure you pick a 64-bit version of Debian Bullseye. Before clicking “Write”, go click on the settings icon and enable ssh. You can also set up a user, hostname, authorization keys and WiFi.
Now insert the card into your Raspberry Pi, connect power and you should be able to ssh to the pi. So, with the default pi user, that would be
ssh pi@raspberrypi.Installing Docker
To install Docker we have to follow the Docker Debian installation guide (The Raspian guide leads to a configuration that won’t be able to find any stable docker installation).
First, we have to install the dependencies for adding the new repository:
sudo apt-get updatesudo apt-get install ca-certificates curl gnupgAdd Docker’s official GPG key:
sudo install -m 0755 -d /etc/apt/keyringscurl -fsSL https://download.docker.com/linux/debian/gpg | sudo gpg --dearmor -o /etc/apt/keyrings/docker.gpgsudo chmod a+r /etc/apt/keyrings/docker.gpgAnd set up the Docker repository:
echo \ "deb [arch="$(dpkg --print-architecture)" signed-by=/etc/apt/keyrings/docker.gpg] https://download.docker.com/linux/debian \ "$(. /etc/os-release && echo "$VERSION_CODENAME")" stable" | \ sudo tee /etc/apt/sources.list.d/docker.list > /dev/nullNow we can install docker and docker-compose:
sudo apt-get updatesudo apt-get install docker-ce docker-ce-cli containerd.io docker-buildx-plugin docker-compose-plugin docker-composeTo be able to run docker command without using sudo we have to add our current user to the Docker group:
sudo groupadd docker`sudo usermod -aG docker $USERz
newgrp dockerConfiguring Lemmy
We need to download a few configuration files. The configuration files listed in the guide don’t support Arm64, so I took the files from Lemmy 1.17.3 and modified them, so they pick the ARM version of the docker images. The NGINX configuration does work, but it is included to make the download simpler:
curl https://gist.githubusercontent.com/Fireblade75/95a0dfa7abbedff554eb9109434060cd/raw/5cf6eddbe706dd25b84234ce619f18a4faca854a/docker-compose.yml -o docker-compose.ymlcurl https://gist.githubusercontent.com/Fireblade75/95a0dfa7abbedff554eb9109434060cd/raw/5cf6eddbe706dd25b84234ce619f18a4faca854a/lemmy.hjson -o lemmy.hjsoncurl https://gist.githubusercontent.com/Fireblade75/95a0dfa7abbedff554eb9109434060cd/raw/5cf6eddbe706dd25b84234ce619f18a4faca854a/nginx.conf -o nginx.confIf you want to change the default password of the database, make sure that you change it both in the docker-compose file and the lemmy.hjson configuration.
Now we can run
docker-compose up, this downloads all the containers and starts the Lemmy server. Check the logs for errors and see if there is anything we still need to solve. When the services are done starting, we can stop the cluster again by pressing control + C.A problem I had was that the image server did not get the right permissions to the location where it wants to store its files. To solve this, we simply have to run the following command:
sudo chown -R 991:991 volumes/pictrs/Running Lemmy
When all errors are solved, we can start the cluster in detached mode. Let’s first destroy the containers by using
docker-compse down. And after that we can rundocker-compose up -d. The containers should start now, but this time docker-compose is running in detached mode, this mode does not block the terminal and lets Docker run in the background.You now have a working installation of Lemmy on a Raspberry Pi. It listens to port 80, so you should be able to navigate to it from other devices in your network. For example, by going to http://raspberrypi/ . The default user is lemmy and its password is lemmylemmy, this is configured inside the lemmy.hjson file. If you later want to update Lemmy to a newer version, you can just change the version of the Docker images inside the docker-compose file.
Hopefully this helped you understand how to set up Lemmy, if you have any question please ask.
- Beehaw's mod tool needs
cross-posted from: https://beehaw.org/post/574562
> Here's a laundry list of sort with tons of tools we'd like to see > > - Role for approval of applications (to delegate) > - Site mods (to delegate from admins) > - Auto-report posts with certain keywords or domains (for easier time curating without reports) > - Statistics on growth (user, comments, posts, reports) > - User total > - MUA > - User retention > - Number of comments > - Number of posts > - Number of reports open > - Number of reports resolved > - Sort reports > - by resolved/open > - by local/remote > - Different ways to resolved a report > - Suspend account for a limited amount of time rather than just banning > - Send warning > - Account mod info > - Number of 'strikes' (global and local) and reports > - Moderation notes > - Change email > - Change password > - Change role > - Ability to pin messages in a post > - Admins should be able to purge > - Filter modlog to local > - Better federation tools (applications to communities, limiting) > - Applications to communities to allow safe spaces to exist (people should not be able to just "walk in" on a safe space - similarly to follow requests in Mastodon in a way) > - Limiting (Lock our communities down from certain instances but still allow people using our instance to talk to people from those instances) > > Obviously considering the moment when this is being made - federation tools are our highest priority.
- Activity Streams 2.0
We all know that Lemmy is part of the Fediverse, but how does it do that. This is done trough federating with both other Lemmy servers, but also by implementing the ActivityStreams protocol sot it can communicate with other applications on the Fediverse.
The linked document describes the protocol and how it should work.
- Setting up Lemmy for Local development (OSX / Linux)
If you want to help with the development or just want to test things with your own Lemmy instance, you will have to set up a local instance on your own PC. This is not that hard, but it is not uncommon that you will do something wrong and if you are not, that experienced with the technology that is used, it can be hard to understand the error messages that you receive. That’s why I wrote this blog to help developers to run their own local instance.
So when setting up your local instance, it is a good idea to read the official guide for local development. We will now set up both the API/back-end and the front-end.
The back-end
First, we need the rust toolchain. The easiest way is to just get Rustup by following the installation command you find on this website.
Now before we start checking or building the back-end we need to install all required libraries.
For Debian-based (like Ubuntu) this is:
sudo apt install git cargo libssl-dev pkg-config libpq-dev curl postgresqlFor Arch-based this is:
sudo pacman -S git cargo libssl-dev pkg-config libpq-dev curl postgresqlFor macOS, you can just install postgresql:
brew install postgresql brew services start postgresql /usr/local/opt/postgres/bin/createuser -s postgresNow we need to add a db user for Lemmy to the database. Sometimes psql cannot be found, in those cases you can often just switch to the postgresql user with
sudo su postgrespsql -c "create user lemmy with password 'password' superuser;" -U postgres psql -c 'create database lemmy with owner lemmy;' -U postgresYou can change the password if you want, in that case remember the password you entered.
Now we have everything we need for the back-end, it is time to download the Lemmy project.
git clone https://github.com/LemmyNet/lemmy.git --recursive git clone https://github.com/LemmyNet/lemmy-ui.git --recursiveMake sure you don’t forget the --recursive flag, it is required to download all the code.
Now we can have a look at the configuration of the back-end. In the “lemmy” project there should be a folder named “config”, in this config file are 2 files, defaults.hjson and config.hjson. If you need to make settings to your server, you can make those in the config.hjson file. You can use this to change the password of the database, for example. The defaults.hjson file should help with finding out how this can be done.
Now we can check if everything works correctly, open a shell in the “lemmy” project (this is the back-end). There should be a Cargo.toml file in this folder.
Here you can now run
cargo checkto check if everything compiles. This should run fine, and then you can runcargo run. Now you should have a running server.After making changes, you need to format the code with cargo +nightly fmt --all and run the linter with
./scripts/fix-clippy.sh.The front-end
To get started with the front-end we need both Node and Yarn. Node is available through brew with “brew install node”, but you can also install it from the Node.js website. For many Linux distributions, it is also possible to use your package manager.
Then we still need Yarn, there are again multiple ways to install Yarn, the recommended way to install yarn is trough corepack, this is explained on the yarn website. You can also install it through brew with “brew install yarn” or simply trough npm with
npm install -g yarn. I went for the npm route.After installing yarn, you can install all node dependencies with
yarn installand start the development server withyarn start.Image uploads
We did not set up an image server, so you won’t be able to upload images. The docker setup does support this, but for general development building the docker containers is too slow.
Windows
I haven’t tried this out on Windows, but you should be able to follow all the Linux steps with Windows subsystem for Linux. You might be able to get it to work natively, but some installation steps will be different.